19 Nov 2018
XMonad offers unparalleled customizability, especially with the extensive xmonad-contrib library. However, as the modules in xmonad-contrib are simply listed in an alphabetical order, and there’s no voting mechanism to help differentiate the usefulness (to most users at least) of them, it took me some time to go through a few of them and find what could best benefit my workflow. Setting up xmobar and trayer for the status bar was also not that straightforward.
Here I’ll list some modules that were helpful to me (accompanied by screenshots), in the hope that some might find this article useful and save them some time. My full configuration files are posted at the end of the article.
This also serves as a note to myself as I keep exploring XMonad. I’m still a learner and I’d appreciate it if you point out mistakes in my configuration.
From i3 to XMonad
I’ve been using Thinkpad X1 Carbon with Arch Linux for a while and my experience has been great. The only two features I miss from MacOS are the built-in Dictionary and the seamless HiDPI support, but I can get by without them just fine. The pleasure of being able to harness the full power of Arch Linux together with a proper window manager far outweighs the inconvenience. The topic of X1 Carbon vs. Macbook is probably best left for another article though.
I started with i3, as it is undoubtedly the most popular WM out there, and perhaps the most beginner-friendly. However, some of i3’s inflexibility constantly gnawed at me. Eventually I decided that I’m comfortable enough with WMs to begin exploring something more customizable.
In comparison to i3, the mental model adopted by XMonad is (unexpectedly) much more intuitive in several aspects, out of the box:
- The concepts of “screen” and “workspace” are cleanly separate, which is great. You are able to switch to/move an application to a particular screen, without worrying about which exact workspace is currently on that screen. This is a life-changer for me as I now almost exclusively use screen-switching keys (which I’ve conveniently defined as Mod+a, Mod+s, and Mod+d).
- A screen merely “projects” a workspace. This is to say, any workspace that is not currently shown, does not “belong” to any particular screen either. You can easily put any other workspace onto the current screen just by Mod+workspaceid. This is a massive improvement from the tedious i3 procedure. This also ensures that disconnecting/reconnecting to external monitors remains a smooth experience, as workspaces get automatically projected to available screens.
- You are free to customize the workspace layout to your heart’s content. The automatic layout algorithms ensure that you won’t need to perform manual splits like those in i3. The default
Tall layout is already very sensible in that it is automatically able to use both axes of the screen.
Useful modules from xmonad-contrib
The above are only the beginning, as xmonad-contrib offers many ready-to-use modules which massively enhance the already great defaults.
Layouts
Layout algorithms are the fundamentals of any window manager. There are tons of layouts in xmonad-contrib, but save for a summary page without screenshots on the Wiki, there doesn’t seem to be much easily accessible information around. I’ve tried out each layout in there. IMO while most of them suit very specific needs and might not be very useful for most users’ daily workflow, a few of them could become indispensable. I’ll list such layouts below, complete with screenshots.
Tabbed (XMonad.Layout.Tabbed)
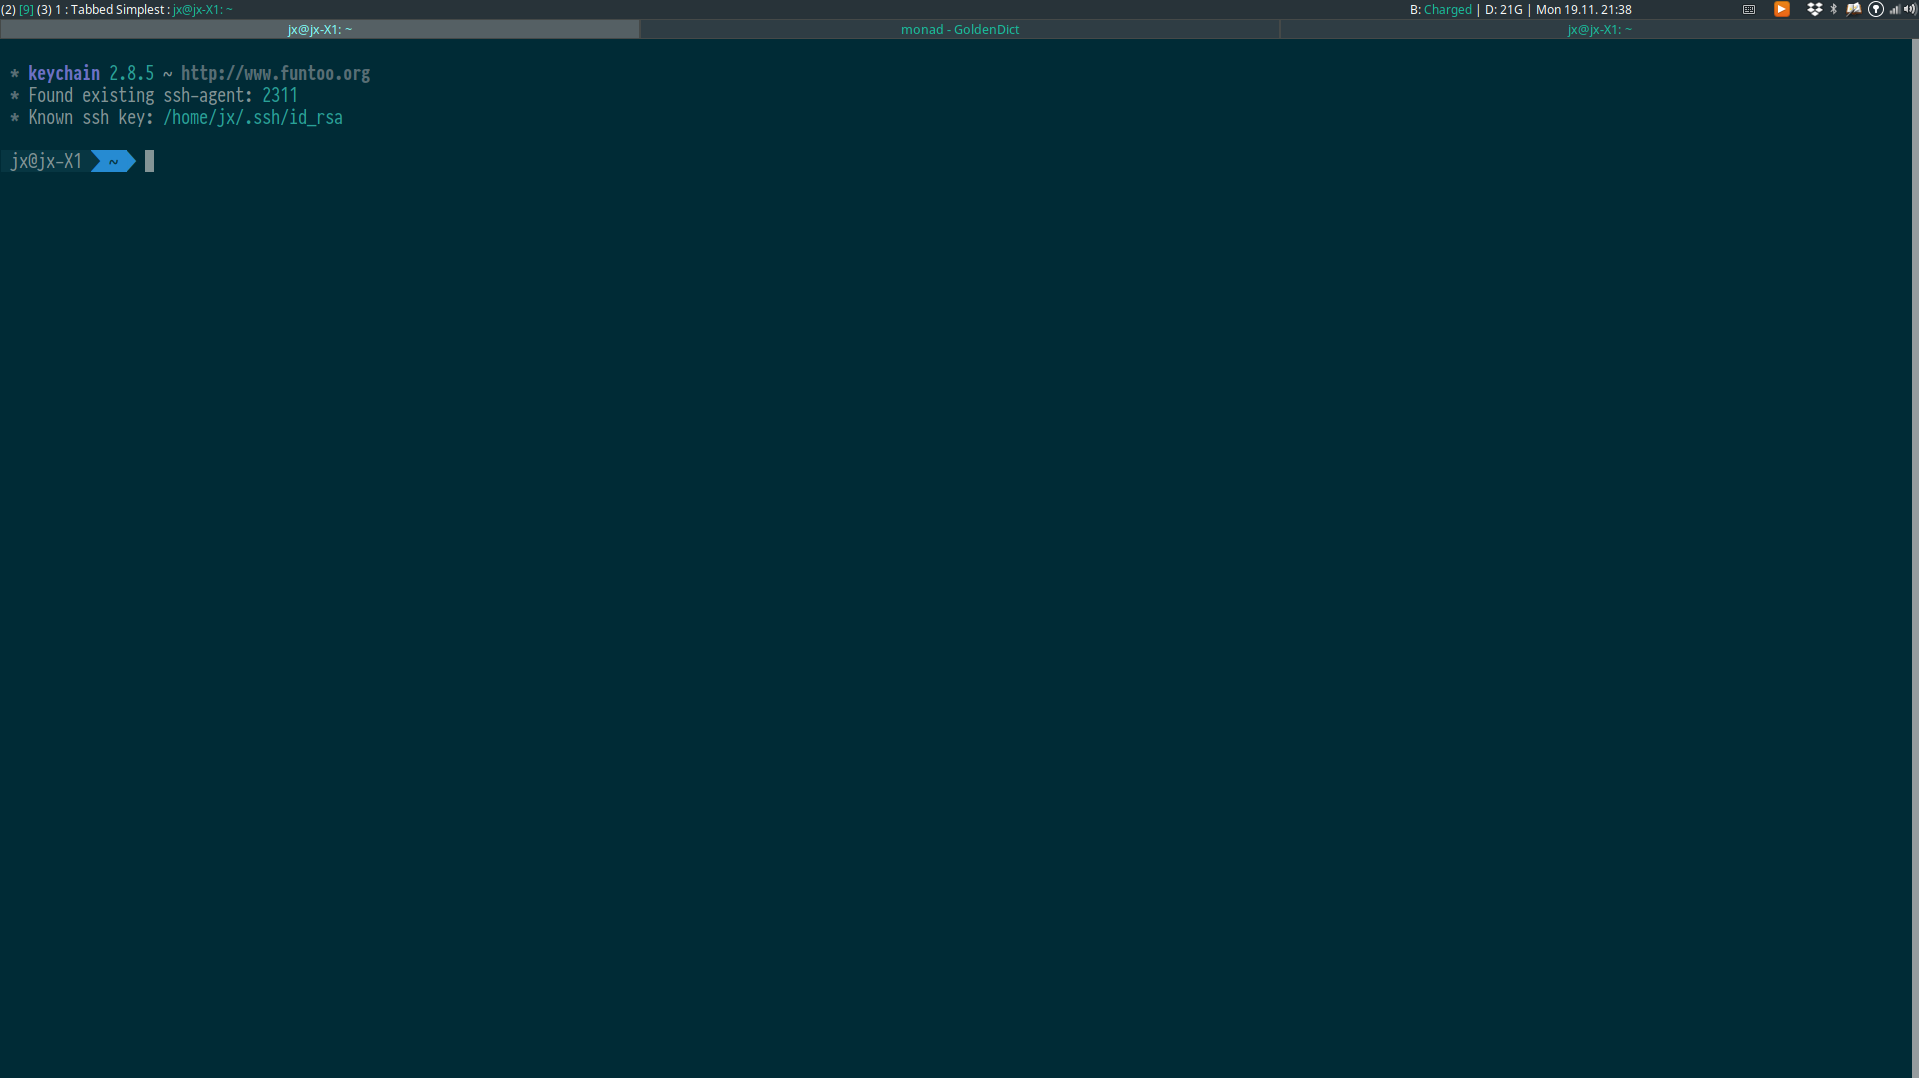
This layout adds tabs to the default Fullscreen layout. It’s in a sense similar to i3’s default fullscreen layout.
This is the essential layout for multi-monitor setups, where each application automatically occupies the whole screen.
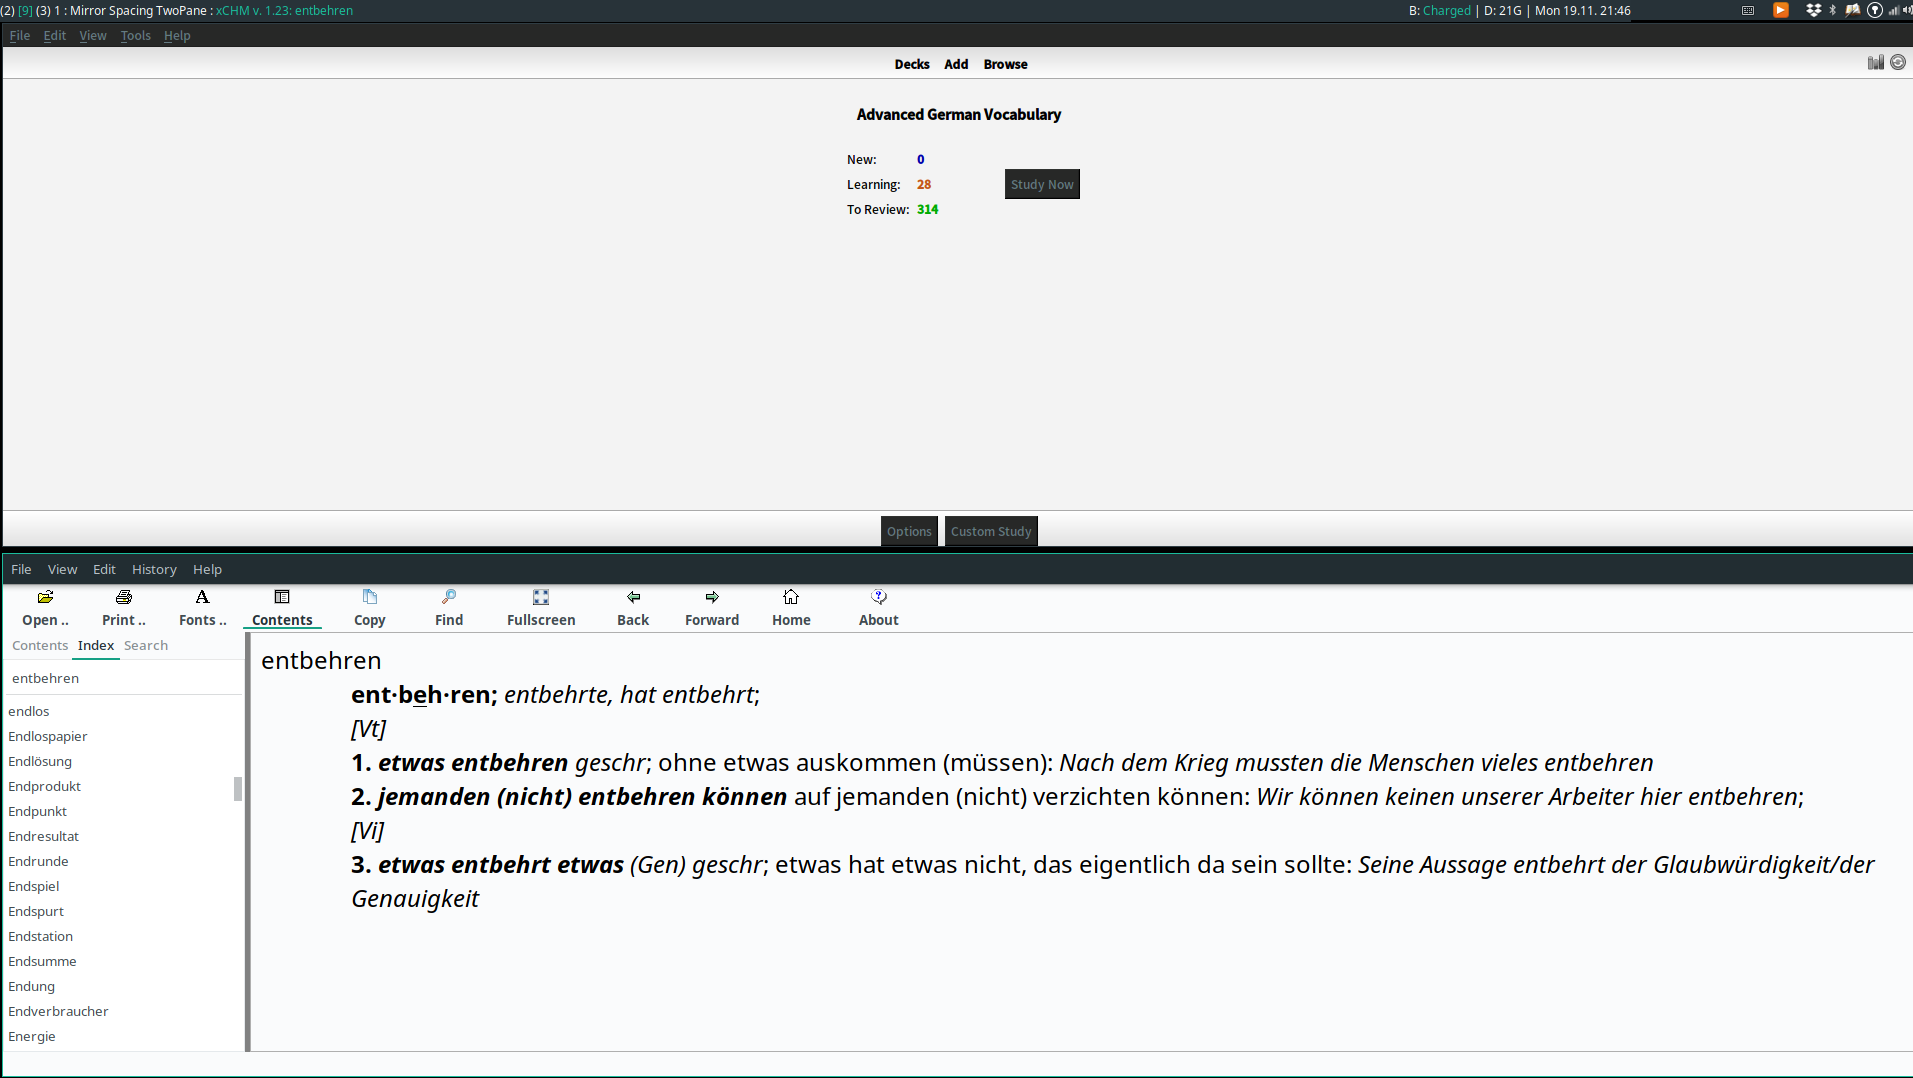
TwoPane (XMonad.Layout.TwoPane)
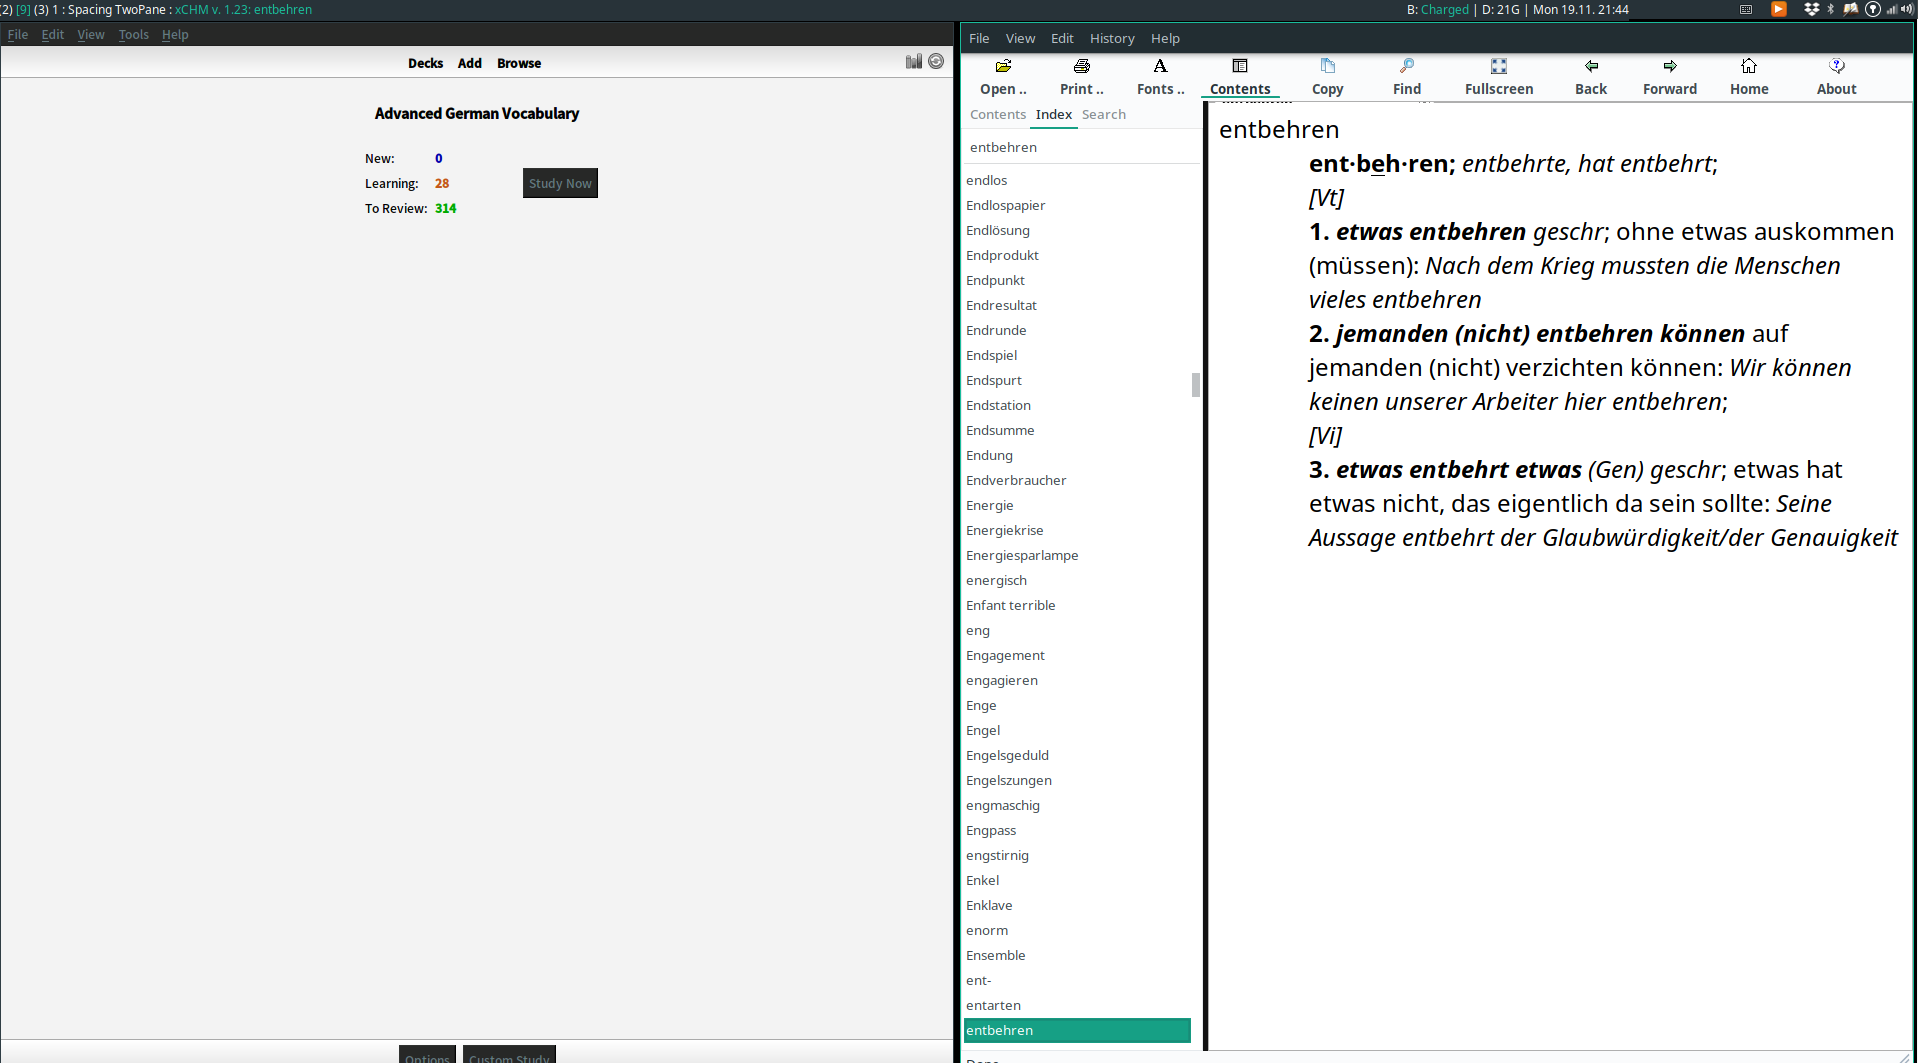
This is a frequent use case I had in i3: Divide a window into two panes and cycle between applications within an individual pane. For example, I might have a tech talk playing in one pane, while alternatively programming with a code editor or taking notes with org-mode in the other pane. Another example is keeping Anki/an article open in one pane and cycling between different dictionary apps in the other. The TwoPane layout achieves this by fixing the application in the main pane while allowing you to cycle through other applications in the secondary pane.
By default the split is vertical. However, just like the case in Tall layout, by simply mirroring the layout you can also make the split horizontal, as shown in the screenshot.
There’s also a DragPane layout that allows you to additional resize the split ratio by mouse, and offers more configuration options. However it didn’t seem to work on my system as the pane borders constantly blink.
ResizableTall (XMonad.Layout.ResizableTile)
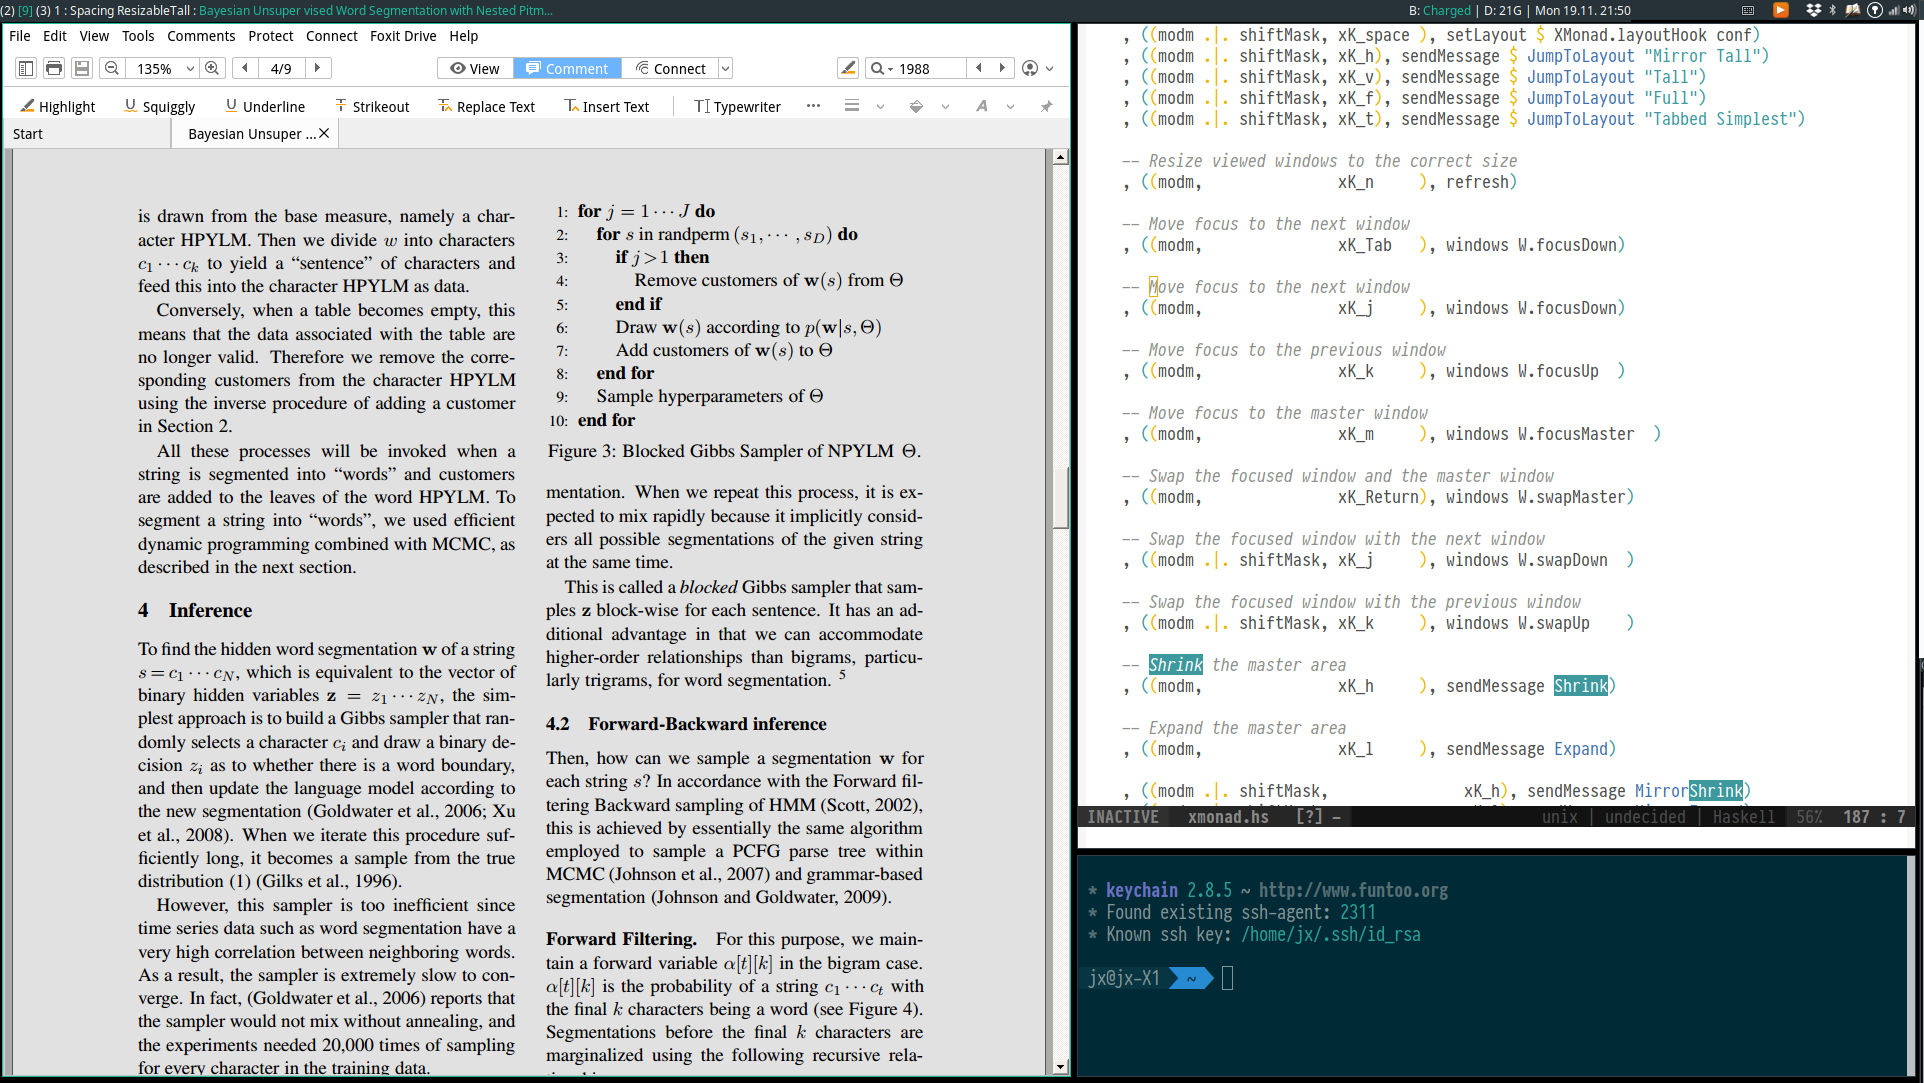
The default Tall layout only allows for adjusting the ratio of the main split, i.e. all the secondary panes will have the same size. However, there might be a use case where you want to have one relatively large secondary pane (e.g. Emacs) and a relatively small secondary pane (e.g. terminal). ResizableTall extends Tall by allowing for the layout to be extended just fine.
The screenshot shows both the ratio of the main split and that between the secondary panes adjusted.
emptyBSP (XMonad.Layout.BinarySpacePartition)
This layout will automatically split your focused window in two to make space for the newly created window.
Spiral, Dwindle (XMonad.Layout.Dwindle)
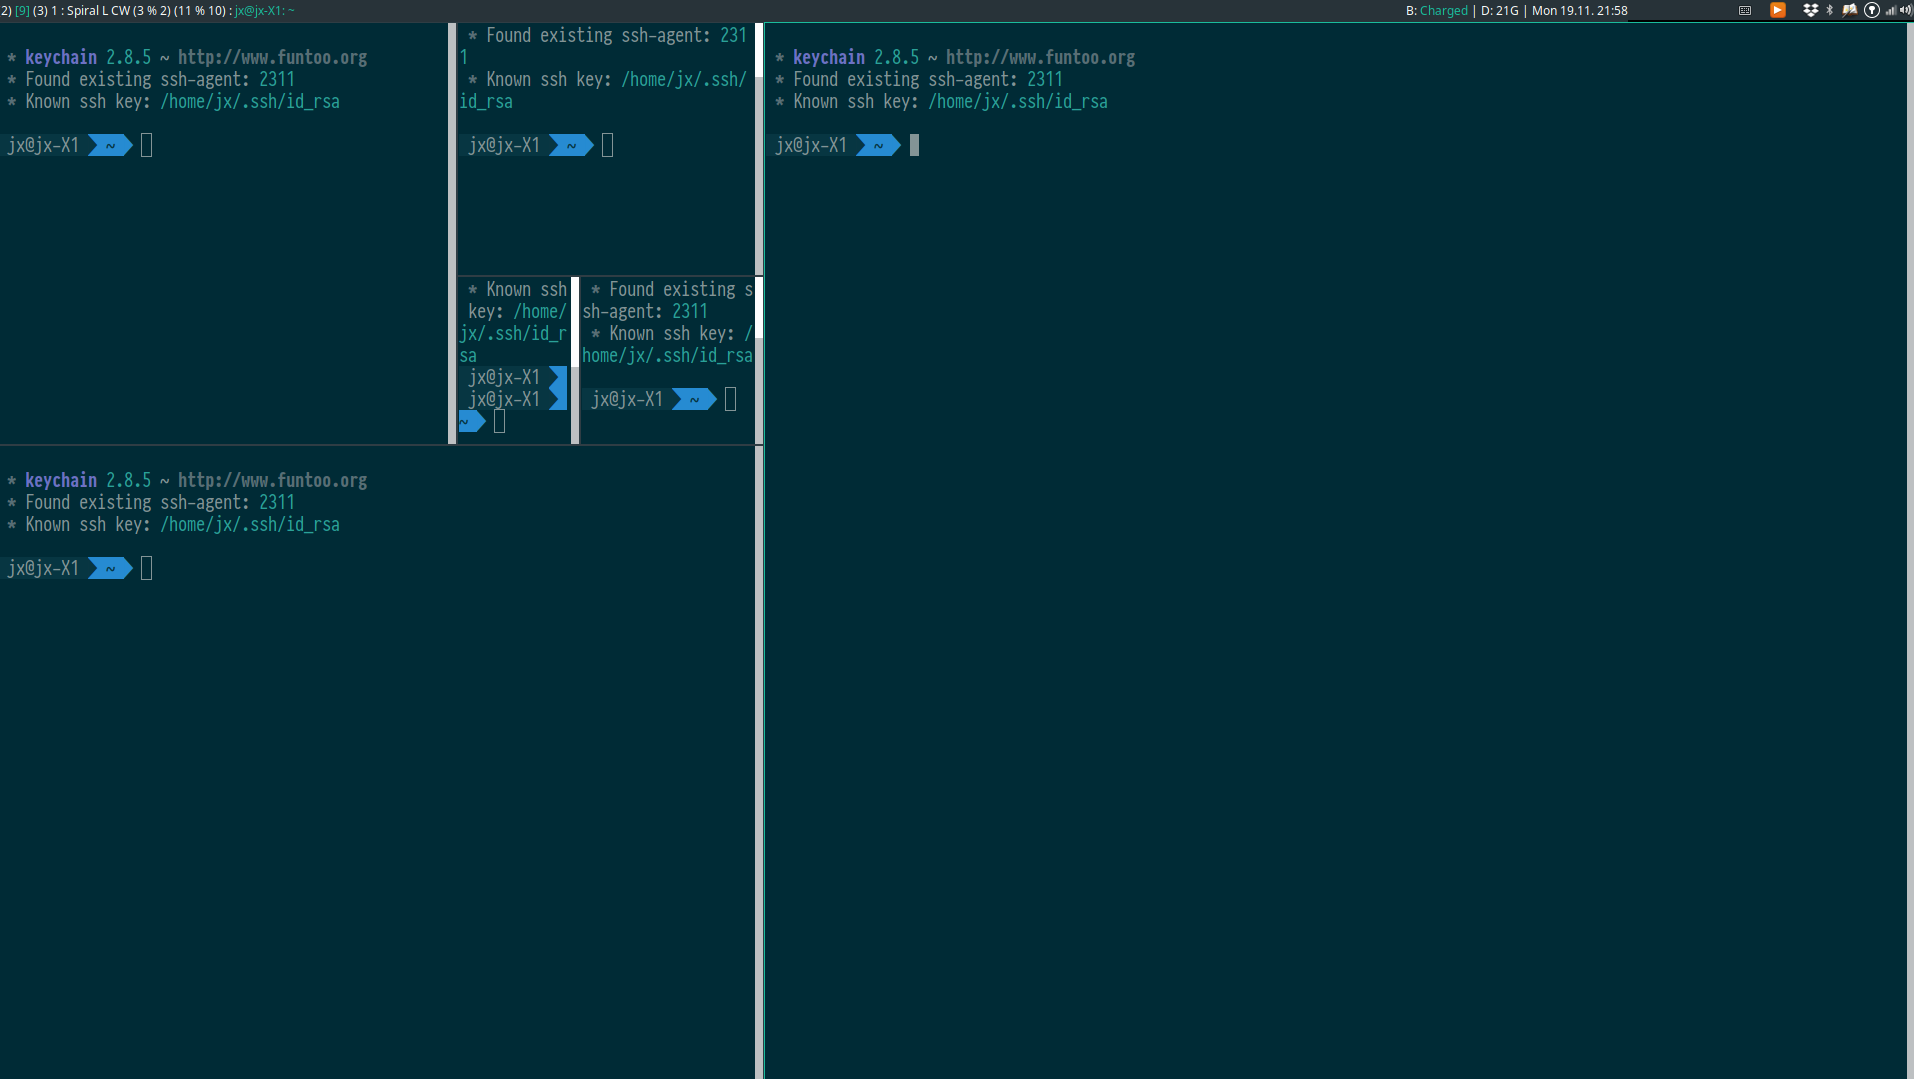
These two layouts imitate awesomeWM and produce increasingly smaller windows in fixed locations.
I find the above listed layouts able to satisfy almost all of my daily needs for now. However, you can create much more complicated custom layouts by using modules such as Xmonad.Layout.Combo or Xmonad.Layout.LayoutCombinators.
XMonad.Actions.PhysicalScreens
This is an essential module for multi-monitor setups. When multiple monitors are connected, the screen ids get assigned quite arbitrarily by default. However, we’d normally want the screens numbered in a left-to-right order according to their physical locations. This module provides the getScreen and viewScreen functions that help us do just that.
Example usage:
--
-- mod-{w,e,r}, Switch to physical/Xinerama screens 1, 2, or 3
-- mod-shift-{w,e,r}, Move client to screen 1, 2, or 3
--
[((modm .|. mask, key), f sc)
    | (key, sc) <- zip [xK_w, xK_e, xK_r] [0..]
    , (f, mask) <- [(viewScreen def, 0), (sendToScreen def, shiftMask)]]
XMonad.Layout.Spacing
This achieves the same thing as that by i3gaps. XMonad argues that the correct terminology for this should be “spacing” instead of “gaps”, since “gaps” should refer to the gap between a window and the edges, not between panes within a window.
This makes the layout a bit less crowded.
myLayout = avoidStruts $
  ...
  ||| tiled
  ||| twopane
  ...
  where
     tiled = spacing 3 $ ResizableTall nmaster delta ratio []
     twopane = spacing 3 $ TwoPane delta ratio
XMonad.Hooks.EwmhDesktops
You need to add an ewmh hook if you want to correctly use rofi to locate and switch to a running application by its name.
Just import the module and then add ewmh as such:
main = do
    ...
    xmonad $ ewmh def
        {
        ...
        }
XMonad.Layout.NoBorders
It would be silly to have a border around the window if the window always occupies the whole screen. Use noBorders to avoid that in such layouts (e.g. tabbed, Full).
myLayout = avoidStruts $
  noBorders (tabbed shrinkText myTabConfig)
  ...
historyHook (XMonad.Actions.GroupNavigation)
historyHook keeps track of your window history and allows for actions such as going back to the most recent window.
Just append >> historyHook to the end of your logHook, e.g.
        , logHook = dynamicLogWithPP myPP {
                                          ppOutput = hPutStrLn xmproc
                                          }
                        >> historyHook
xmobar and trayer
Normally one would want to have a status bar and an application/applet tray. The most popular choices for those seems to be xmobar and trayer.
The configuration options for xmobar is stored in .xmobarrc. They are relatively well-documented in the official README.
Note that one would need to manually leave some space to the side of the xmobar so that the trayer can be displayed:
In .xmobarrc:
Config {
       ...
       , position = TopW L 85
       ...
       }
I spawn xmobar in my xmonad.hs file:
main = do
    xmproc <- spawnPipe "xmobar"
    xmonad $ ewmh def
        {
        ...
        , logHook = dynamicLogWithPP myPP {
                                          ppOutput = hPutStrLn xmproc
                                          }
                        >> historyHook
        ...
        }
and spawn trayer in my startup script:
trayer --edge top --align right --SetDockType true --SetPartialStrut true \
       --expand true --width 15 --transparent true --alpha 0 --tint 0x283339 --height 20\
       --monitor 1 &
Note that by setting --transparent true, --alpha 0 --tint 0x283339, I was able to ensure that it has the same background color as what I set in .xmobarrc.
Since xmobar and trayer are completely separate processes, if one of them crashes you can just relaunch it individually without impacting the other one’s normal functioning.
Adding an entry in /usr/share/xsessions for startup applications
Finally, when logging in, one might want to launch some startup applications prior to launching xmonad itself, just as one would do in .i3/config with exec.
You can simply write a bash script run-xmonad which includes all the commands you want to run. For example:
#!/bin/bash

setxkbmap -option "ctrl:nocaps"
xset r rate 200 50 &

trayer --edge top --align right --SetDockType true --SetPartialStrut true \
       --expand true --width 15 --transparent true --alpha 0 --tint 0x283339 --height 20\
       --monitor 1 &
nm-applet &
xfce4-power-manager &
pactl load-module module-bluetooth-discover &
blueman-applet &

# User apps
dropbox start &
thunderbird &
goldendict &
pulseaudio &
pa-applet &

xmonad
Note that there is a file /usr/share/xsessions/xmonad.desktop already, which allows you to launch xmonad after logging into an xsession. You can simply create a copy and change the line
to
Name=Xmonad (with startup apps)
Exec=/home/jx/Dropbox/scripts/run-xmonad
You should then be able to choose this new entry from your dm at your next login.
My full configuration files
~/.xmonad/xmonad.hs
import XMonad hiding ((|||))
import qualified XMonad.StackSet as W
import qualified Data.Map        as M

-- Useful for rofi
import XMonad.Hooks.EwmhDesktops
import XMonad.Hooks.DynamicLog
import XMonad.Hooks.ManageDocks
import XMonad.Util.Run(spawnPipe)
import XMonad.Util.EZConfig(additionalKeys, additionalKeysP, additionalMouseBindings)
import System.IO
import System.Exit
-- Last window
import XMonad.Actions.GroupNavigation
-- Last workspace. Seems to conflict with the last window hook though so just
-- disabled it.
-- import XMonad.Actions.CycleWS
-- import XMonad.Hooks.WorkspaceHistory (workspaceHistoryHook)
import XMonad.Layout.Tabbed
import XMonad.Hooks.InsertPosition
import XMonad.Layout.SimpleDecoration (shrinkText)
-- Imitate dynamicLogXinerama layout
import XMonad.Util.WorkspaceCompare
import XMonad.Hooks.ManageHelpers
-- Order screens by physical location
import XMonad.Actions.PhysicalScreens
import Data.Default
-- For getSortByXineramaPhysicalRule
import XMonad.Layout.LayoutCombinators
-- smartBorders and noBorders
import XMonad.Layout.NoBorders
-- spacing between tiles
import XMonad.Layout.Spacing
-- Insert new tabs to the right: https://stackoverflow.com/questions/50666868/how-to-modify-order-of-tabbed-windows-in-xmonad?rq=1
-- import XMonad.Hooks.InsertPosition

--- Layouts
-- Resizable tile layout
import XMonad.Layout.ResizableTile
-- Simple two pane layout.
import XMonad.Layout.TwoPane
import XMonad.Layout.BinarySpacePartition
import XMonad.Layout.Dwindle

myTabConfig = def { activeColor = "#556064"
                  , inactiveColor = "#2F3D44"
                  , urgentColor = "#FDF6E3"
                  , activeBorderColor = "#454948"
                  , inactiveBorderColor = "#454948"
                  , urgentBorderColor = "#268BD2"
                  , activeTextColor = "#80FFF9"
                  , inactiveTextColor = "#1ABC9C"
                  , urgentTextColor = "#1ABC9C"
                  , fontName = "xft:Noto Sans CJK:size=10:antialias=true"
                  }

myLayout = avoidStruts $
  noBorders (tabbed shrinkText myTabConfig)
  ||| tiled
  ||| Mirror tiled
  -- ||| noBorders Full
  ||| twopane
  ||| Mirror twopane
  ||| emptyBSP
  ||| Spiral L XMonad.Layout.Dwindle.CW (3/2) (11/10) -- L means the non-main windows are put to the left.

  where
     -- The last parameter is fraction to multiply the slave window heights
     -- with. Useless here.
     tiled = spacing 3 $ ResizableTall nmaster delta ratio []
     -- In this layout the second pane will only show the focused window.
     twopane = spacing 3 $ TwoPane delta ratio
     -- The default number of windows in the master pane
     nmaster = 1
     -- Default proportion of screen occupied by master pane
     ratio   = 1/2
     -- Percent of screen to increment by when resizing panes
     delta   = 3/100

myPP = def { ppCurrent = xmobarColor "#1ABC9C" "" . wrap "[" "]"
           , ppTitle = xmobarColor "#1ABC9C" "" . shorten 60
           , ppVisible = wrap "(" ")"
           , ppUrgent  = xmobarColor "red" "yellow"
           , ppSort = getSortByXineramaPhysicalRule def
           }

myManageHook = composeAll [ isFullscreen --> doFullFloat

                          ]

myKeys conf@(XConfig {XMonad.modMask = modm}) = M.fromList $

    -- launch a terminal
    [ ((modm .|. shiftMask, xK_Return), spawn $ XMonad.terminal conf)

    -- close focused window
    , ((modm .|. shiftMask, xK_q     ), kill)

     -- Rotate through the available layout algorithms
    , ((modm,               xK_space ), sendMessage NextLayout)

    --  Reset the layouts on the current workspace to default
    , ((modm .|. shiftMask, xK_space ), setLayout $ XMonad.layoutHook conf)
    , ((modm .|. shiftMask, xK_h), sendMessage $ JumpToLayout "Mirror Tall")
    , ((modm .|. shiftMask, xK_v), sendMessage $ JumpToLayout "Tall")
    , ((modm .|. shiftMask, xK_f), sendMessage $ JumpToLayout "Full")
    , ((modm .|. shiftMask, xK_t), sendMessage $ JumpToLayout "Tabbed Simplest")

    -- Resize viewed windows to the correct size
    , ((modm,               xK_n     ), refresh)

    -- Move focus to the next window
    , ((modm,               xK_Tab   ), windows W.focusDown)

    -- Move focus to the next window
    , ((modm,               xK_j     ), windows W.focusDown)

    -- Move focus to the previous window
    , ((modm,               xK_k     ), windows W.focusUp  )

    -- Move focus to the master window
    , ((modm,               xK_m     ), windows W.focusMaster  )

    -- Swap the focused window and the master window
    , ((modm,               xK_Return), windows W.swapMaster)

    -- Swap the focused window with the next window
    , ((modm .|. shiftMask, xK_j     ), windows W.swapDown  )

    -- Swap the focused window with the previous window
    , ((modm .|. shiftMask, xK_k     ), windows W.swapUp    )

    -- Shrink the master area
    , ((modm,               xK_h     ), sendMessage Shrink)

    -- Expand the master area
    , ((modm,               xK_l     ), sendMessage Expand)

    -- Shrink and expand ratio between the secondary panes, for the ResizableTall layout
    , ((modm .|. shiftMask,               xK_h), sendMessage MirrorShrink)
    , ((modm .|. shiftMask,               xK_l), sendMessage MirrorExpand)

    -- Push window back into tiling
    , ((modm,               xK_t     ), withFocused $ windows . W.sink)

    -- Increment the number of windows in the master area
    , ((modm              , xK_comma ), sendMessage (IncMasterN 1))

    -- Deincrement the number of windows in the master area
    , ((modm              , xK_period), sendMessage (IncMasterN (-1)))

    -- Toggle the status bar gap
    -- Use this binding with avoidStruts from Hooks.ManageDocks.
    -- See also the statusBar function from Hooks.DynamicLog.
    , ((modm              , xK_b     ), sendMessage ToggleStruts)
    , ((controlMask, xK_Print), spawn "sleep 0.2; scrot -s")
    , ((0, xK_Print), spawn "scrot") -- 0 means no extra modifier key needs to be pressed in this case.
    , ((modm, xK_F3), spawn "pcmanfm")
    , ((modm.|. shiftMask, xK_F3), spawn "gksu pcmanfm")
    ]

    ++
      [((m .|. modm, k), windows $ f i)
      | (i, k) <- zip (XMonad.workspaces conf) [xK_1 .. xK_9]
      , (f, m) <- [(W.greedyView, 0), (W.shift, shiftMask)]]
    ++
      [((m .|. modm, key), f sc)
      | (key, sc) <- zip [xK_a, xK_s, xK_d] [0..]
      -- Order screen by physical order instead of arbitrary numberings.
      , (f, m) <- [(viewScreen def, 0), (sendToScreen def, shiftMask)]]

main = do
    xmproc <- spawnPipe "xmobar"
    xmonad $ ewmh def
        { modMask = mod4Mask
        , keys = myKeys
        , manageHook = manageDocks <+> myManageHook
        , layoutHook = myLayout
        , handleEventHook = handleEventHook def <+> docksEventHook
        , logHook = dynamicLogWithPP myPP {
                                          ppOutput = hPutStrLn xmproc
                                          }
                        >> historyHook
        , terminal = "lxterminal"
        -- This is the color of the borders of the windows themselves.
        , normalBorderColor  = "#2f3d44"
        , focusedBorderColor = "#1ABC9C"
        }
        `additionalKeysP`
        [
          ("M1-<Space>", spawn "rofi -combi-modi window,run,drun -show combi -modi combi")
          , ("C-M1-<Space>", spawn "rofi -show run")
          -- Restart xmonad. This is the same keybinding as from i3
          , ("M-S-c", spawn "xmonad --recompile; xmonad --restart")
          , ("M-S-q", kill)
          , ("M-'", windows W.swapMaster)
          , ("M1-<Tab>", nextMatch History (return True))
          , ("M-<Return>", spawn "lxterminal")
          -- Make it really hard to mispress...
          , ("M-M1-S-e", io (exitWith ExitSuccess))
          , ("M-M1-S-l", spawn "i3lock")
          , ("M-M1-S-s", spawn "i3lock && systemctl suspend")
          , ("M-M1-S-h", spawn "i3lock && systemctl hibernate")
        ] `additionalMouseBindings`
        [ ((mod4Mask, button4), (\w -> windows W.focusUp))
        , ((mod4Mask, button5), (\w -> windows W.focusDown))
        ]
~/.xmobarrc
Config {
       font = "xft:Noto Sans:size=9:antialias=true,Noto Sans CJK SC:size=9:antialias=true"
       , bgColor = "#283339"
       , fgColor = "#F9fAF9"
       , position = TopW L 85
       , commands = [
                    Run Battery [ "--template" , "B: <acstatus>"
                                , "--L" , "15"
                                , "--H" , "75"
                                , "--low"      , "darkred"
                                , "--normal"   , "darkorange"
                                , "--high"     , "#1ABC9C"
                                , "--" -- battery specific options
                                       -- discharging status
                                       , "-o"	, "<left>% (<timeleft>)"
                                       -- AC "on" status
                                       , "-O"	, "<fc=#dAA520>Charging</fc>"
                                       -- charged status
                                       , "-i"	, "<fc=#1ABC9C>Charged</fc>"
                                ] 50
                    -- , Run Cpu [ "--template" , "C: <total>%", "-L","0","-H","50","--normal","#1ABC9C","--high","darkred"] 10
                    -- , Run Memory ["-t","M: <usedratio>%"] 10
                    , Run DiskU [("/", "D: <free>")] ["-L", "20", "-H", "60"] 10
                    -- , Run Swap [] 10
                    , Run Date "%a %d.%m. %H:%M" "date" 10
                    , Run StdinReader
                    ]
       , sepChar = "%"
       , alignSep = "}{"
       , template = "%StdinReader% }{ %battery% | %disku% | %date%"
       }
01 Aug 2018
Table of Contents
Recently I needed to deploy two Phoenix applications on a CentOS server that I was provided with. A normal way to do so would be to use subdomains, i.e. using appA.domain.com and appB.domain.com. However, in this case I was not able to configure the DNS records for the server. I had to thus resort to appending path segments to the domain, i.e. domain.com/appA and domain.com/appB, and rely on a reverse proxy to route the request to the corresponding app.
HAProxy seemed an attractive option for the reverse proxy, as its configuration syntax is clean and straightforward. However, there is relatively few documentation for it compared with Nginx, and it took me a while to figure everything out. I’d like to share my experience in this article.
The commands are tested on a fresh CentOS 7.5 VM.
Installing HAProxy
This section documents the steps to install the newest HAProxy and get it running. You may also just choose to install it using the package manager of your system and skip ahead to the next section after verifying the installation. Part of this section is based on this online guide.
The HAProxy version in the CentOS repo is not up to date. To install the newest version of HAProxy, first download the source code from http://www.haproxy.org/#down.
wget http://www.haproxy.org/download/1.8/src/haproxy-1.8.13.tar.gz
tar -xzvf haproxy-1.8.13.tar.gz
cd haproxy-1.8.13
You may first need to install the dependencies with
sudo yum install gcc pcre-static pcre-devel openssl openssl-devel
before the compilation.
You can then compile HAProxy with
sudo make TARGET=linux2628 USE_PCRE=1 USE_OPENSSL=1 USE_ZLIB=1
A few notes about the flags:
TARGET=linux2628: The build targets Linux 2.6.28, 3.x, and above. Such kernel versions should be the ones in use by default nowadays in most Linux systems.USE_PCRE=1: Use libpcre for regex processing.USE_OPENSSL=1: This is important for adding SSL/TLS support. Otherwise we would not be able to let HAProxy use our own SSL certificates in the later configurations.USE_ZLIB=1: Enable native support for zlib to benefit from HTTP compression.
After the compilation finishes, run
to install it.
Then, some initialization steps need to be performed:
sudo ln -s /usr/local/sbin/haproxy /usr/sbin/haproxy
sudo mkdir -p /etc/haproxy
sudo mkdir -p /var/lib/haproxy
# Useful if you want to enable the default stats page for HAProxy
sudo touch /var/lib/haproxy/stats
sudo cp ~/haproxy-1.8.13/examples/haproxy.init /etc/init.d/haproxy
sudo chmod 755 /etc/init.d/haproxy
sudo systemctl daemon-reload
sudo chkconfig haproxy on
sudo useradd -r haproxy
Before we are able to use HAProxy, we may also need to open up the ports 80 and 443 to outside traffic, if they aren’t open already. You can either do it by directly modifying iptables, or use the firewall-cmd frontend that comes with CentOS 7. The following is the direct iptables command:
sudo iptables -A INPUT -p tcp -m multiport --dports 80,443 -m conntrack --ctstate NEW,ESTABLISHED -j ACCEPT
sudo systemctl reload iptables
Now we can add a basic configuration file with sudo vi /etc/haproxy/haproxy.cfg:
global
    log /dev/log local0
    log /dev/log local1 notice
    chroot /var/lib/haproxy
    stats timeout 30s
    user haproxy
    group haproxy
    daemon
    maxconn 2048

defaults
    log global
    mode http
    option httplog
    option dontlognull
    timeout connect 5000
    timeout client 50000
    timeout server 50000
    option forwardfor
    option http-server-close

frontend http_front
    bind *:80
    stats uri /haproxy?stats
    default_backend http_back

backend http_back
    balance roundrobin
    server web1 127.0.0.1:80 check
We can then start up HAProxy with
sudo systemctl start haproxy
You should be able to see the HAProxy stats page at http://example.com/haproxy?stats. This means you have successfully installed HAProxy.
Phoenix-specific HAProxy configurations
Now that HAProxy runs normally, let’s edit the configuration file /etc/haproxy/haproxy.cfg so that it is able to serve two different Phoenix apps, distinguishing them using path segments.
global
    log /dev/log local0
    log /dev/log local1 notice
    chroot /var/lib/haproxy
    stats timeout 30s
    user haproxy
    group haproxy
    daemon
    maxconn 2048

defaults
    log global
    mode http
    option httplog
    option dontlognull
    timeout connect 5000
    timeout client 50000
    timeout server 50000
    option forwardfor
    option http-server-close

frontend http_front
    # We don't really need the stats page now.
    # stats uri /haproxy?stats
    bind *:80
    acl appA_url url_beg /appA
    acl appB_url url_beg /appB
    use_backend appA if appA_url
    use_backend appB if appB_url

backend appA
    http-request set-path %[path,regsub(/appA/?,/)]
    balance roundrobin
    server web1 127.0.0.1:4001 check

backend appB
    http-request set-path %[path,regsub(/appB/?,/)]
    balance roundrobin
    server web1 127.0.0.1:5001 check
acl appA_url url_beg /appA creates an access control list called appA_url that is activated whenever the URL path after the domain name begins with /appA.use_backend appA if appA_url then tells HAProxy to select the backend called appA if the ACL appA_url is activated.http-request set-path %[path,regsub(/appA/?,/)] modifies the HTTP request so that the path segment /appA/ is replaced with / before it goes through to the actual Phoenix app. This is important because we don’t want to modify the router.ex file of the app. That is to say, if you have
  scope "/", App do
    pipe_through :browser
    get "/", PageController, :index
  end
which expects to serve the homepage at http://example.com/, the router will still receive the incoming HTTP requests as if they were for http://example.com/ instead of for http://example.com/appA/ , and thus serve the pages correctly.
(We will also need to change a part of Phoenix configuration for this to work. This will be covered in the next section.)
server web1 127.0.0.1:4001 check assumes that appA is being served at port 4001 of this machine. The relevant Phoenix configuration will be covered in the next section.
Don’t forget to restart HAProxy with sudo systemctl restart haproxy after saving the changes.
Checking for errors in the HAProxy configuration file
N.B.: Sometimes the haproxy service might fail to start due to errors in `haproxy.cfg`. The following command checks for errors in the config file:
sudo haproxy -c -V -f /etc/haproxy/haproxy.cfg
Configuring Phoenix Apps
Now we need to also configure the relevant Phoenix apps so that they work in conjunction with HAProxy. For this we need to modify App.Endpoint in config/prod.exs:
config :app, App.Endpoint,
  url: [host: "example.com", path: "/appA"],
  http: [port: 4001],
  cache_static_manifest: "priv/static/cache_manifest.json"
-
Note how we added path: "/appA" under the :url key. This is necessary, because we want the links automatically generated by Phoenix (e.g. http://example.com/appA/js/app-01302d06e5b1534d67ec820fde5c1292.js?vsn=d) to still have the /appA path segment in them, so that HAProxy can properly identify the HTTP requests as going to appA. After identifying the incoming requests, the ACL appA_url will be activated and HAProxy will proceed to strip the path segment, before rerouting the HTTP request to the appA backend.
Think about it this way: If we don’t do this, the incoming HTTP requests by clients would directly ask for example.com/js/app.js instead of example.com/appA/js/app.js. However, since HAProxy doesn’t have any ACL defined that matches the former case, it won’t know how to handle the request, and an error will be returned as the result.
- We are using HTTP since HTTPS connection between the server and the client will be handled by HAProxy. Of course, it can still be a good practice to use HTTPS for the connection between HAProxy and Phoenix, especially if your app and HAProxy actually live on different machines.
- We manually specify
port: 4001 to match up with the port specified in the HAProxy configuration. You can also use {:system, "PORT"} instead of 4001, and feed in the port as an environment variable when launching the app.
Needless to say, the same edits are to be performed on appB, with the path as "/appB" and the port as 5001.
To ensure that the applications automatically start on boot, create a systemd service for each app in the folder /lib/systemd/system:
app-a.service:
[Unit]
Description=AppA

[Service]
Type=simple
User=username
Group=groupname
Restart=on-failure
Environment=MIX_ENV=prod "PORT=4001"
Environment=LANG=en_US.UTF-8

WorkingDirectory=/path/to/appA
ExecStart=/usr/local/bin/mix phoenix.server

[Install]
WantedBy=multi-user.target
app-b.service:
[Unit]
Description=AppB

[Service]
Type=simple
User=username
Group=groupname
Restart=on-failure
Environment=MIX_ENV=prod "PORT=5001"
Environment=LANG=en_US.UTF-8

WorkingDirectory=/path/to/appB
ExecStart=/usr/local/bin/mix phoenix.server

[Install]
WantedBy=multi-user.target
and enable them with sudo systemctl enable app-a.service sudo systemctl enable app-b.service. Start them with systemctl start.
If everything is set up correctly up to this point, you should now be able to access the applications at http://example.com/appA and http://example.com/appB.
(The systemd configuration is taken from an ElixirForum thread by yurko, where further details and discussions can be found.)
Working with Distillery
Instead of the plain
WorkingDirectory=/path/to/appB
ExecStart=/usr/local/bin/mix phoenix.server
we might want to use distillery to package our Phoenix apps. This also allows us to stop and restart the apps more easily. The corresponding systemd config would be:
[Service]
Type=simple
User=user
Group=group
WorkingDirectory=/path/to/appB
ExecStart=/path/to/appB/_build/prod/rel/appB/bin/appB foreground
ExecStop=/path/to/appB/_build/prod/rel/appB/bin/appB stop
Environment=LANG=en_US.UTF-8
Environment=MIX_ENV=prod
Environment=RELEASE_MUTABLE_DIR=/path/to/appB/_build/prod/rel/appB/var/tmp
LimitNOFILE=65536
UMask=0027
SyslogIdentifier=appB
Restart=always
RestartSec=5
Adding TLS support via HAProxy
Normally we’d want to serve our apps via HTTPS, which HAProxy also supports.
First, we need to concatenate all the related keys/certs (.pem files) into one. The order required by HAProxy is:
- server private key (without any password)
- server certificate
- intermediate certificate 1
- intermediate certificate 2
- Root trusted authority certificate (if any)
For example, if your cert files are stored under /etc/pki/tls/certs/, you would run
DOMAIN='example.com' sudo -E bash -c 'cat /etc/pki/tls/private/key_example.pem /etc/pki/tls/certs/cert_example.pem /etc/pki/tls/certs/chain.pem > /etc/haproxy/certs/$DOMAIN.pem'
If you use letsencrypt, it’s likely that you already have a fullchain.pem that you can use directly.
DOMAIN='example.com' sudo -E bash -c 'cat /etc/letsencrypt/live/privkey.pem /etc/letsencrypt/live/fullchain.pem > /etc/haproxy/certs/$DOMAIN.pem'
There is also a letsencrypt plugin for HAProxy, though I haven’t used it myself.
Then, we need to modify /etc/haproxy/haproxy.cfg again:
global
    log /dev/log local0
    log /dev/log local1 notice
    chroot /var/lib/haproxy
    stats timeout 30s
    user haproxy
    group haproxy
    daemon
    maxconn 2048
    # TLS
    tune.ssl.default-dh-param 2048
    ssl-default-bind-ciphers ECDH+AESGCM:DH+AESGCM:ECDH+AES256:DH+AES256:ECDH+AES128:DH+AES:ECDH+3DES:DH+3DES:RSA+AESGCM:RSA+AES:RSA+3DES:!aNULL:!MD5:!DSS
    # Disable SSL v3, which is insecure
    ssl-default-bind-options no-sslv3

defaults
    log global
    mode http
    option httplog
    option dontlognull
    timeout connect 5000
    timeout client 50000
    timeout server 50000
    option forwardfor
    option http-server-close

frontend http_front
    bind *:80
    http-request add-header X-Forwarded-Proto http
    acl appA_url url_beg /appA
    acl appB_url url_beg /appB
    use_backend appA if appA_url
    use_backend appB if appB_url

frontend https_front
    bind *:443 ssl crt /etc/haproxy/certs/example.com.pem
    http-request add-header X-Forwarded-Proto https
    acl appA_url url_beg /appA
    acl appB_url url_beg /appB
    use_backend appA if appA_url
    use_backend appB if appB_url

backend appA
    http-request redirect scheme https if ! { ssl_fc }
    http-request set-path %[path,regsub(/appA/?,/)]
    balance roundrobin
    server web1 127.0.0.1:4001 check

backend appB
    http-request redirect scheme https if ! { ssl_fc }
    http-request set-path %[path,regsub(/appB/?,/)]
    balance roundrobin
    server web1 127.0.0.1:5001 check
- We added some TLS-specific configurations under
global, after the comment # TLS
- We added a
HTTPS frontend. It binds to port 443, and uses the concatenated certificate file that we just produced in the previous step.
- In the backends, we added a
http-request redirect directive to make sure that even if a user visited the website via HTTP (port 80), they will still be redirected to the HTTPS site instead.
Restart haproxy with sudo systemctl restart haproxy. Now, the apps should be up and running under https://example.com/appA and https://example.com/appB.
(Here is an alternative configuration for the frontend and backend portions):
frontend http_front
    bind *:80
    http-request add-header X-Forwarded-Proto http
    http-request redirect scheme https

frontend https_front
    bind *:443 ssl crt /etc/haproxy/certs/example.com.pem
    http-request add-header X-Forwarded-Proto https
    acl appA_url url_beg /appA
    acl appB_url url_beg /appB
    use_backend appA if appA_url
    use_backend appB if appB_url

backend appA
    http-request set-path %[path,regsub(/appA/?,/)]
    balance roundrobin
    server web1 127.0.0.1:4001 check

backend appB
    http-request set-path %[path,regsub(/appB/?,/)]
    balance roundrobin
    server web1 127.0.0.1:5001 check
08 Jun 2016
Update March 2020
It’s been a while since this article was originally written (in 2016). Fortunately, Shadowsocks remains a reliable way to circumvent the GFW, especially considering the fact that even more paid VPN services are struggling now. There have been a few changes to Shadowsocks over the years, and I’d like to provide a more up-to-date and minimalist guide.
Server
There have been multiple Shadowsocks server implementations over the years. Currently the most active one is shadowsocks-rust, though the one I find easiest to use is go-shadowsocks2.
- Set up a Digital Ocean VPS (Detailed explanation and alternatives to DO can be found in the section “Spinning Up a VPS” below). After setting up the VPS on DigitalOcean, we’ll want to download the go-shadowsocks2 binary:
- Ensure that
wget, gunzip and ufw are installed by running sudo apt install wget gunzip ufw.
- Open the port
8488 with sudo ufw allow 8488; sudo ufw enable.
- Download the release with
wget https://github.com/shadowsocks/go-shadowsocks2/releases/download/v0.1.0/shadowsocks2-linux.gz. You can find the latest release version at the Github repo.
- Extract the executable with
gunzip shadowsocks2-linux.gz
- Change the permission for the executable with
chmod +x ./shadowsocks2-linux
- Run the server with
./shadowsocks2-linux -s 'ss://AEAD_CHACHA20_POLY1305:your_password@:8488' -verbose
By now you should already have a running Shadowsocks server. If you want to make it more robust/”proper”, you could make it a systemd service on the VPS, which I’m not going to describe in detail here.
Client
There’s no need for the proxy switching plugins anymore. Native clients for Shadowsocks exist for all major platforms(Windows, MacOS, Linux, Android, iOS) and are fairly intuitive to use. I would just describe the necessary configuration, based on the way we started the server above:
- Server: The IP address of the Digital Ocean VPS that you launched.
- Remote port:
8488 (corresponds to the 8488 part above).
- Password:
your_password (corresponds to the your_password part above).
- Encryption Method:
CHACHA20-IETF-POLY1305 (corresponds to the AEAD_CHACHA20_POLY1305 part above).
That’s it. If everything’s configured correctly, you should now be able to access the internet without restrictions, via the VPS.
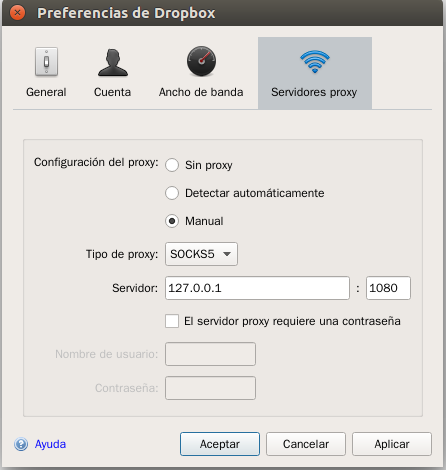
Note that for some applications, you may need to manually configure the proxy so that their traffic goes through the Shadowsocks client. The following is an example for Dropbox under MacOS. Under Dropbox Preferences’ “Network” tab, you can find a “Proxies” button. Configure the proxy with the following parameters:
- Proxy type:
SOCKS5
- Server:
127.0.0.1:1086 (this is the port on which our local Shadowsocks client is running).
You should be able to configure other apps similarly.
Introduction
I’m not sure how great a need there is for another proxy to circumvent the Great Fire Wall (GFW) for expats living in China. You’ve probably done your homework and obtained a VPN before coming here, or have some VPN service already available from your company. Nevertheless, seeing that the government is increasingly tightening its grip on the Internet and killing a few previously functioning paid VPN services, and that there seem to be few posts about Shadowsocks out there available in English, I feel it wouldn’t hurt to contribute another entry here. The advantage of such a proxy is obvious: since you’ll be the one who operates your own server with presumably limited bandwidth usage, it would be very hard for the authority to find it out, target it and kill it off. It has become a kind of de facto GFW circumvention tool for many programmers. Hopefully this post would be of some use to you and help you access the Internet more happily in China, or whatever place with heavy Internet censorship. At least this would also serve as a note for myself if I were to perform a new installation some time later.
A word of caution before I proceed: Shadowsocks refers to a protocol and a family of open-source software which implement the protocol, originally conceived by one developer (@clowwindy). Its encryption relies on a pre-shared key and block cipher algorithms. It focuses on being lightweight and fast, however the security aspects of the Shadowsocks protocol likely haven’t been rigorously evaluated by security experts. It’s good for daily needs, but you probably won’t want to solely rely on it if you need total anonymity/a particularly strong level of protection.
Spinning Up a VPS (Virtual Private Server)
Shadowsocks is a proxy software, it means you’ll first need a server to proxy the traffic with. There are a handful of decent VPS (Virtual Private Server) providers out there with attractive pricing (starting from $5 per month), for example:
(You may notice that referral codes are included in some of the links. Signing up from a referral can get you $10 credit at DigitalOcean, while Vultr offers $5 credit currently).
There are also some other low-end options available at lower prices. However they don’t usually offer servers in Asia:
- https://lowendbox.com/
- http://buyvm.net/
If you’re in China, it would make sense to choose a server in the Asia-Pacific region. Vultr offers Tokyo and Sydney, while DigitalOcean offers Singapore and most recently, Bangalore. The Tokyo and Singapore servers are reported to work pretty well. However, if your network, like mine, is provided by China Telecom, it seems that the Bangalore/Sydney server’s performance far exceeds those of the previous two. I was only able to watch YouTube in 240p with the Tokyo server, but now 720p isn’t much of an issue. Or maybe it’s just because the region only has relatively few users by now. In any case, YMMV and it’s always best to try them out by yourself, either via the official speedtest or better, just set up the proxy and test it in action: The servers are billed per hour so just performing some tests won’t rake up huge costs.
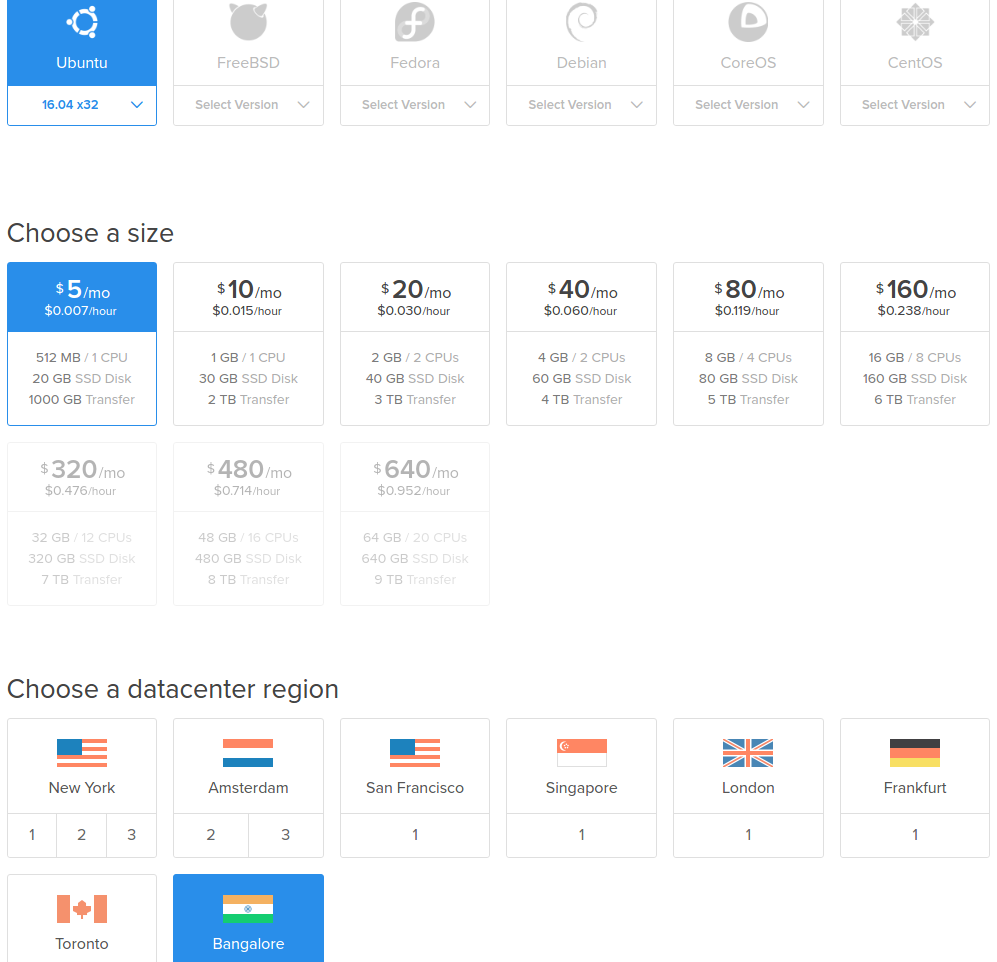
I’ll demonstrate using the example of a server running Ubuntu 16.04 LTS on DigitalOcean. This process should be applicable to other VPS providers as well since they all provide Ubuntu as an option.
-
As shown in the picture below, Choose Ubuntu 16.04 LTS x32, $5/mo option, and the appropriate region.
-
Set up your user account. There is an excellent tutorial series on DigitalOcean detailing the whole process:
-
Step 1, connect to the droplet with ssh. You’ll use OpenSSH if you’re on Mac/Unix or PuTTY on Windows to ssh into the newly created droplet.
-
Step 2, add a new user. This is actually not mandatory for setting up Shadowsocks but it’s a part of the common procedure of setting up a Ubuntu server. It should make the system more secure.
For the record, the following are all the commands needed to add a user called “demo”. The $local prefix means the command is executed on your local machine:
local$ ssh root@SERVER_IP_ADDRESS
adduser demo
gpasswd -a demo sudo
local$ ssh-copy-id demo@SERVER_IP_ADDRESS # Optional, add public key authentication
vim /etc/ssh/sshd_config # Change PermitRootLogin to no. You may also use nano instead of vim
service ssh restart
Install the server application for Shadowsocks
After you’re able to log in as the new user you’ve just created (via ssh demo@SERVER_IP_ADDRESS), you can now install the server application for Shadowsocks. There are a few implementations in different languages available. I’m using the Go version by @cyfdecyf since
-
It’s easy to run. Just download the binary and you’re good to go.
-
It supports multiple clients with a single process. This means I can simultaneously let my computer and my phone use the proxy from the same server without further complication.
The steps:
-
mkdir shadowsocks && cd shadowsocks to make a directory for shadowsocks.
-
Find the latest release of Shadowsocks and download the archive. To download the currently newest release for 32-bit Linux, run curl -L -O https://github.com/shadowsocks/shadowsocks-go/releases/download/1.1.5/shadowsocks-server-linux32-1.1.5.gz
-
Extract the binary by running gzip -d shadowsocks-server-linux32-1.1.5.gz
-
Make the binary executable by chmod a+x shadowsocks-server-linux32-1.1.5
-
Make a configuration file for the server by executing vim config.json (or nano config.json) and pasting in the content. The following is an example. Note how in this example I specified two separate ports for computer and cellphone, with different passwords “computer” and “mobile”. The full documentation of the file format is available at Github
 {
     "port_password": {
         "8388": "computer",
         "8387": "mobile"
     },
     "method": "aes-128-cfb-auth",
     "timeout": 600
 }
-
Run the server by executing ./shadowsocks-server-linux32-1.1.5 You should see the server displaying startup messages. We’re done here.
(Should there be any abnormality on the server, you can just restart the VPS (via the command line or using control panel of DigitalOcean), ssh into the VPS by ssh demo@SERVER_IP_ADDRESS, and start this application again by cd shadowsocks && ./shadowsocks-server-linux32-1.1.5)
Install the client
The full range of clients available is documented at the official website. Choose the one that suits your platform. I recommend the Qt5 versions for their intuitive GUI. Besides, the alternative version shadowsocks-win didn’t seem to work for me on Windows and is only available in Chinese. The following are the steps for configuration on Ubuntu desktop. The process should be similar for any other system, including Windows and Android.
-
install the app from the corresponding ppa (on Windows you would just directly download and open the .exe file):
 sudo add-apt-repository ppa:hzwhuang/ss-qt5
 sudo apt-get update
 sudo apt-get install shadowsocks-qt5
-
Launch the app from command line. Note that although the package is called shadowsocks-qt5, the binary itself is called ss-qt5!
-
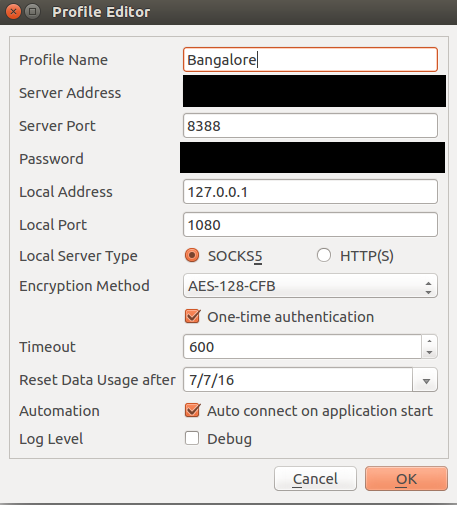
Create a new profile. The following is my configuration file. Please fill in your own server address and password. Ensure your encryption method matches that specified on the server.
Important: Remember to select the option “One-time authentication”
If the connection is successful, then “test latency” in the client app should give you a reasonable latency figure.
-
Configure proxy settings. There are some methods to set the global proxy for the system, but the more common use case is to configure on an app-by-app basis, which would also be more reliable and flexible.
-
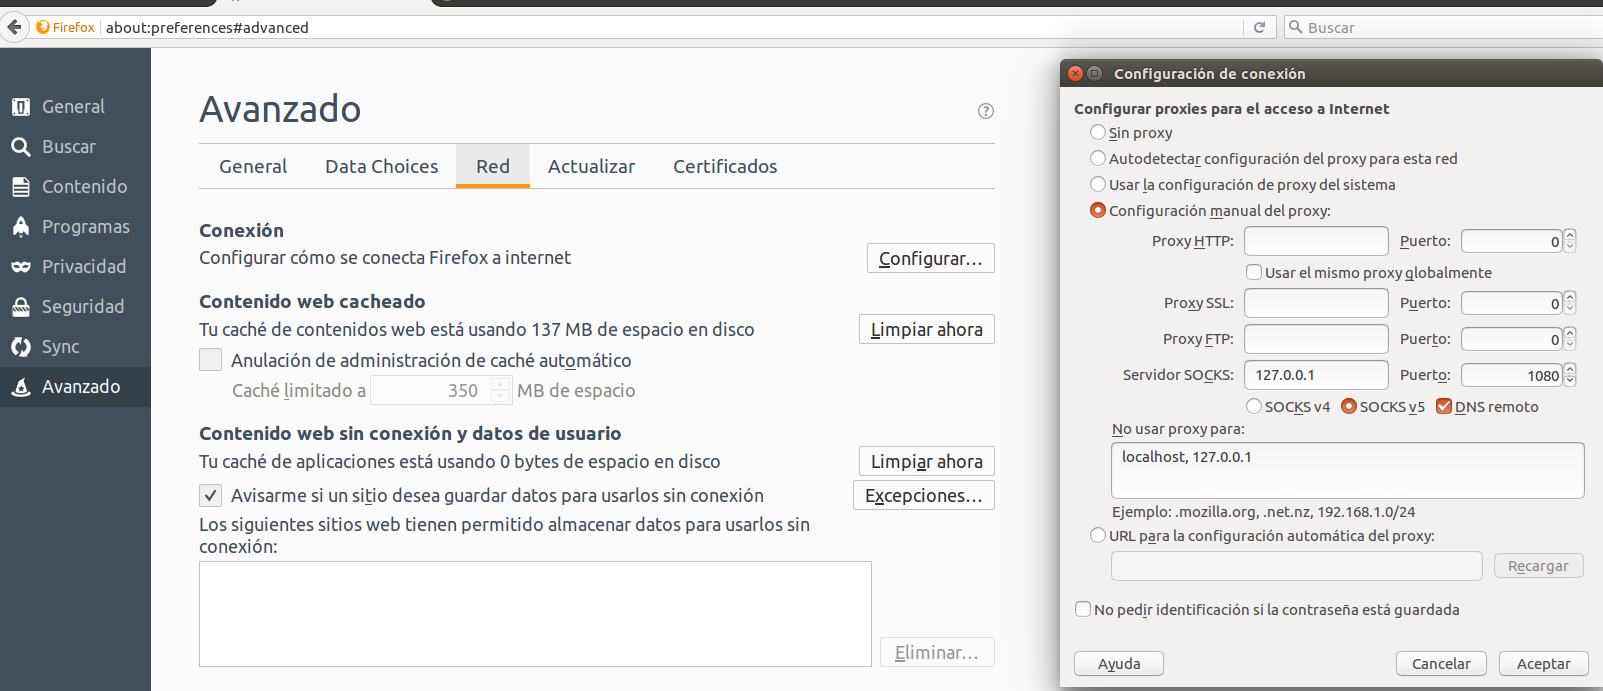
For Firefox, the setting is at Preferences -> Advanced -> Connection.
Important: Remember to tick the option “Remote DNS”. Otherwise the DNS poisoning attack will still be in effect.
-
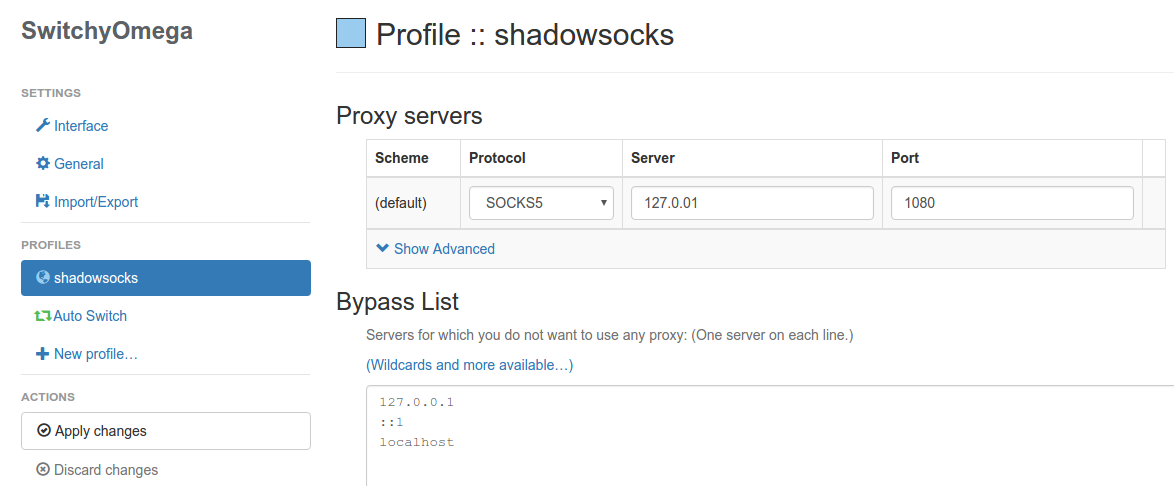
For the stable version of Chrome, there is no built-in setting for proxy. A plugin called SwitchyOmega will help. Since you probably can’t reach Chrome Web Store without circumventing the GFW, you’ll have to search for and install the plugin manually. You may directly download it here. The blogger auooo has also made it available on a web storage. Drag the file into the Chrome “extensions” page (enter chrome://extensions/ in your Chrome address bar to access the page) to install it. Once installed, the configuration is as follows:
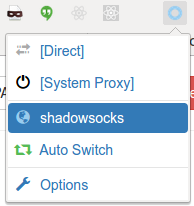
Also remember to select the shadowsocks profile by clicking on the SwitchyOmega icon on the menu bar:
-
For Dropbox, the setting is directly visible among the configuration tabs.
You should be able to apply the similar configuration procedure for other apps that need proxying.
The Android app should be able to proxy all traffic globally by default without the need of manually configuring proxy.
For those who can read Chinese, there is a very detailed post by auooo with step-by-step screenshots of client configuration on every operating system. You may want to refer to that post as well.
P.S.: For Mac OS X users, the most common GUI seems to have Chinese as the only available UI language. You may want to follow the step-by-step guide with pictures (in Chinese), or alternatively, build the Qt5 version of the client by yourself.
29 Apr 2016
Update: The fix for this bug has been released to xenial-updates.
(中文版本看这里)
There is a bug in Ubuntu 16.04 LTS’s default fallback CJK font package fonts-noto-cjk that makes Chrome/Chromium render “thin” weight of the font for Chinese/Japanese/Korean characters, whenever the page’s language is not explicitly set to cn/jp/ko. This makes the characters unreadable. For example, in a Google search page which contains both English and CJK texts, the CJK text will be rendered thin. 
(Example image taken from AskUbuntu)
I’ve reported this bug. It seems the issue is caused by the fact that fonts-noto-cjk uses an all-in-one file which contains all the weights of the font. The problem probably lies with fontconfig or Chrome/Chromium’s font fallback mechanism.
In the meantime, the temporary fix is to remove the package, download the font Noto Sans CJK from Google with each weight contained in an individual file, and manually install the fonts. Then Chrome/Chromium should use the correct weight of the font to render CJK characters.
A member of the Ubuntu Development Team, Gunnar Hjalmarsson, has made a personal PPA containing the font files individually. You may also consider directly using that PPA.
29 Apr 2016
更新: 这个 bug 的补丁已经被发布在 xenial-updates.
(English version here)
Ubuntu 16.04 LTS 的默认中日韩字体package fonts-noto-cjk 有一个 bug。如果网页没有把其页面语言指定为中文/日文/韩文,Chrome/Chromium 会采用”细”字体来显示中/日/韩字符,非常难看。下面是从 AskUbuntu 拿的一个示例图片。
我 report 了这个 bug。这似乎是由于 fonts-noto-cjk 只使用一个文件来包括所有粗细标准的字体。有可能是 fontconfig 或者是 Chrome/Chromium 选择默认字体的机制造成了问题。
暂时的解决方案是,移除 fonts-noto-cjk package, 手动从 Google 下载并安装每个 weight 都单独存于一个文件中的 Noto Sans CJK 字体。这样 Chrome/Chromium 就能够使用正确的粗细了。
Ubuntu 开发团队的 Gunnar Hjalmarsson 制作了一个个人 fonts-noto-cjk PPA,单独包含每个字体文件。你也可以考虑使用他的PPA。