Circumventing the Great Fire Wall (GFW) in China with Shadowsocks
08 Jun 2016Update March 2020
It’s been a while since this article was originally written (in 2016). Fortunately, Shadowsocks remains a reliable way to circumvent the GFW, especially considering the fact that even more paid VPN services are struggling now. There have been a few changes to Shadowsocks over the years, and I’d like to provide a more up-to-date and minimalist guide.
Server
There have been multiple Shadowsocks server implementations over the years. Currently the most active one is shadowsocks-rust, though the one I find easiest to use is go-shadowsocks2.
- Set up a Digital Ocean VPS (Detailed explanation and alternatives to DO can be found in the section “Spinning Up a VPS” below). After setting up the VPS on DigitalOcean, we’ll want to download the go-shadowsocks2 binary:
- Ensure that
wget,gunzipandufware installed by runningsudo apt install wget gunzip ufw. - Open the port
8488withsudo ufw allow 8488; sudo ufw enable. - Download the release with
wget https://github.com/shadowsocks/go-shadowsocks2/releases/download/v0.1.0/shadowsocks2-linux.gz. You can find the latest release version at the Github repo. - Extract the executable with
gunzip shadowsocks2-linux.gz - Change the permission for the executable with
chmod +x ./shadowsocks2-linux - Run the server with
./shadowsocks2-linux -s 'ss://AEAD_CHACHA20_POLY1305:your_password@:8488' -verbose
By now you should already have a running Shadowsocks server. If you want to make it more robust/”proper”, you could make it a systemd service on the VPS, which I’m not going to describe in detail here.
Client
There’s no need for the proxy switching plugins anymore. Native clients for Shadowsocks exist for all major platforms(Windows, MacOS, Linux, Android, iOS) and are fairly intuitive to use. I would just describe the necessary configuration, based on the way we started the server above:
- Server: The IP address of the Digital Ocean VPS that you launched.
- Remote port:
8488(corresponds to the8488part above). - Password:
your_password(corresponds to theyour_passwordpart above). - Encryption Method:
CHACHA20-IETF-POLY1305(corresponds to theAEAD_CHACHA20_POLY1305part above).
That’s it. If everything’s configured correctly, you should now be able to access the internet without restrictions, via the VPS.
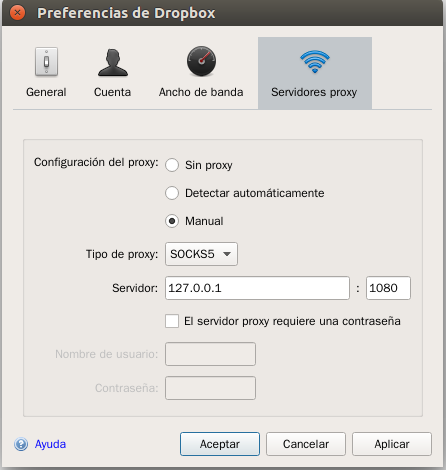
Note that for some applications, you may need to manually configure the proxy so that their traffic goes through the Shadowsocks client. The following is an example for Dropbox under MacOS. Under Dropbox Preferences’ “Network” tab, you can find a “Proxies” button. Configure the proxy with the following parameters:
- Proxy type:
SOCKS5 - Server:
127.0.0.1:1086(this is the port on which our local Shadowsocks client is running).
You should be able to configure other apps similarly.
Introduction
I’m not sure how great a need there is for another proxy to circumvent the Great Fire Wall (GFW) for expats living in China. You’ve probably done your homework and obtained a VPN before coming here, or have some VPN service already available from your company. Nevertheless, seeing that the government is increasingly tightening its grip on the Internet and killing a few previously functioning paid VPN services, and that there seem to be few posts about Shadowsocks out there available in English, I feel it wouldn’t hurt to contribute another entry here. The advantage of such a proxy is obvious: since you’ll be the one who operates your own server with presumably limited bandwidth usage, it would be very hard for the authority to find it out, target it and kill it off. It has become a kind of de facto GFW circumvention tool for many programmers. Hopefully this post would be of some use to you and help you access the Internet more happily in China, or whatever place with heavy Internet censorship. At least this would also serve as a note for myself if I were to perform a new installation some time later.
A word of caution before I proceed: Shadowsocks refers to a protocol and a family of open-source software which implement the protocol, originally conceived by one developer (@clowwindy). Its encryption relies on a pre-shared key and block cipher algorithms. It focuses on being lightweight and fast, however the security aspects of the Shadowsocks protocol likely haven’t been rigorously evaluated by security experts. It’s good for daily needs, but you probably won’t want to solely rely on it if you need total anonymity/a particularly strong level of protection.
Spinning Up a VPS (Virtual Private Server)
Shadowsocks is a proxy software, it means you’ll first need a server to proxy the traffic with. There are a handful of decent VPS (Virtual Private Server) providers out there with attractive pricing (starting from $5 per month), for example:
(You may notice that referral codes are included in some of the links. Signing up from a referral can get you $10 credit at DigitalOcean, while Vultr offers $5 credit currently).
There are also some other low-end options available at lower prices. However they don’t usually offer servers in Asia:
- https://lowendbox.com/
- http://buyvm.net/
If you’re in China, it would make sense to choose a server in the Asia-Pacific region. Vultr offers Tokyo and Sydney, while DigitalOcean offers Singapore and most recently, Bangalore. The Tokyo and Singapore servers are reported to work pretty well. However, if your network, like mine, is provided by China Telecom, it seems that the Bangalore/Sydney server’s performance far exceeds those of the previous two. I was only able to watch YouTube in 240p with the Tokyo server, but now 720p isn’t much of an issue. Or maybe it’s just because the region only has relatively few users by now. In any case, YMMV and it’s always best to try them out by yourself, either via the official speedtest or better, just set up the proxy and test it in action: The servers are billed per hour so just performing some tests won’t rake up huge costs.
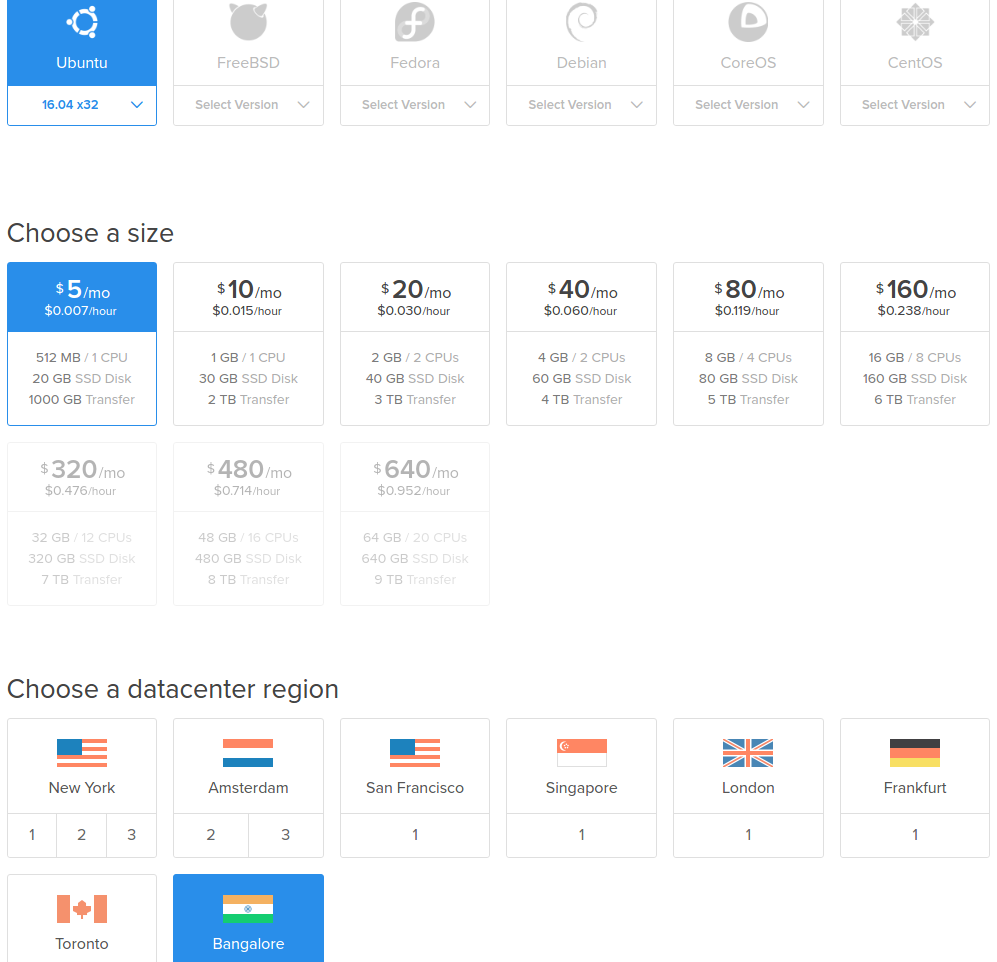
I’ll demonstrate using the example of a server running Ubuntu 16.04 LTS on DigitalOcean. This process should be applicable to other VPS providers as well since they all provide Ubuntu as an option.
-
As shown in the picture below, Choose Ubuntu 16.04 LTS x32, $5/mo option, and the appropriate region.
-
Set up your user account. There is an excellent tutorial series on DigitalOcean detailing the whole process:
-
Step 1, connect to the droplet with ssh. You’ll use OpenSSH if you’re on Mac/Unix or PuTTY on Windows to ssh into the newly created droplet.
-
Step 2, add a new user. This is actually not mandatory for setting up Shadowsocks but it’s a part of the common procedure of setting up a Ubuntu server. It should make the system more secure.
For the record, the following are all the commands needed to add a user called “demo”. The
$localprefix means the command is executed on your local machine: -
local$ ssh root@SERVER_IP_ADDRESS
adduser demo
gpasswd -a demo sudo
local$ ssh-copy-id demo@SERVER_IP_ADDRESS # Optional, add public key authentication
vim /etc/ssh/sshd_config # Change PermitRootLogin to no. You may also use nano instead of vim
service ssh restart
Install the server application for Shadowsocks
After you’re able to log in as the new user you’ve just created (via ssh demo@SERVER_IP_ADDRESS), you can now install the server application for Shadowsocks. There are a few implementations in different languages available. I’m using the Go version by @cyfdecyf since
-
It’s easy to run. Just download the binary and you’re good to go.
-
It supports multiple clients with a single process. This means I can simultaneously let my computer and my phone use the proxy from the same server without further complication.
The steps:
-
mkdir shadowsocks && cd shadowsocksto make a directory for shadowsocks. -
Find the latest release of Shadowsocks and download the archive. To download the currently newest release for 32-bit Linux, run
curl -L -O https://github.com/shadowsocks/shadowsocks-go/releases/download/1.1.5/shadowsocks-server-linux32-1.1.5.gz -
Extract the binary by running
gzip -d shadowsocks-server-linux32-1.1.5.gz -
Make the binary executable by
chmod a+x shadowsocks-server-linux32-1.1.5 -
Make a configuration file for the server by executing
vim config.json(ornano config.json) and pasting in the content. The following is an example. Note how in this example I specified two separate ports for computer and cellphone, with different passwords “computer” and “mobile”. The full documentation of the file format is available at Github{ "port_password": { "8388": "computer", "8387": "mobile" }, "method": "aes-128-cfb-auth", "timeout": 600 } -
Run the server by executing
./shadowsocks-server-linux32-1.1.5You should see the server displaying startup messages. We’re done here.
(Should there be any abnormality on the server, you can just restart the VPS (via the command line or using control panel of DigitalOcean), ssh into the VPS by ssh demo@SERVER_IP_ADDRESS, and start this application again by cd shadowsocks && ./shadowsocks-server-linux32-1.1.5)
Install the client
The full range of clients available is documented at the official website. Choose the one that suits your platform. I recommend the Qt5 versions for their intuitive GUI. Besides, the alternative version shadowsocks-win didn’t seem to work for me on Windows and is only available in Chinese. The following are the steps for configuration on Ubuntu desktop. The process should be similar for any other system, including Windows and Android.
-
install the app from the corresponding ppa (on Windows you would just directly download and open the .exe file):
sudo add-apt-repository ppa:hzwhuang/ss-qt5 sudo apt-get update sudo apt-get install shadowsocks-qt5 -
Launch the app from command line. Note that although the package is called
shadowsocks-qt5, the binary itself is calledss-qt5! -
Create a new profile. The following is my configuration file. Please fill in your own server address and password. Ensure your encryption method matches that specified on the server.
Important: Remember to select the option “One-time authentication”
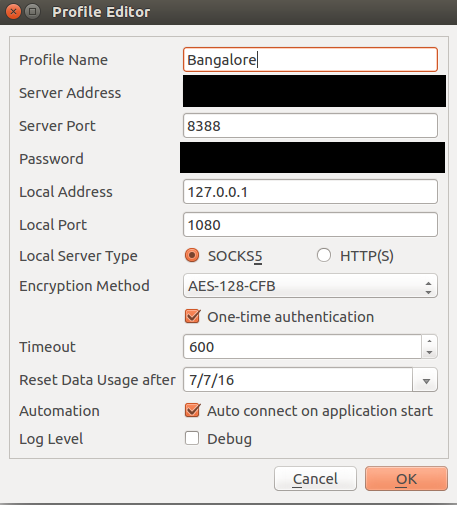
If the connection is successful, then “test latency” in the client app should give you a reasonable latency figure.
-
Configure proxy settings. There are some methods to set the global proxy for the system, but the more common use case is to configure on an app-by-app basis, which would also be more reliable and flexible.
-
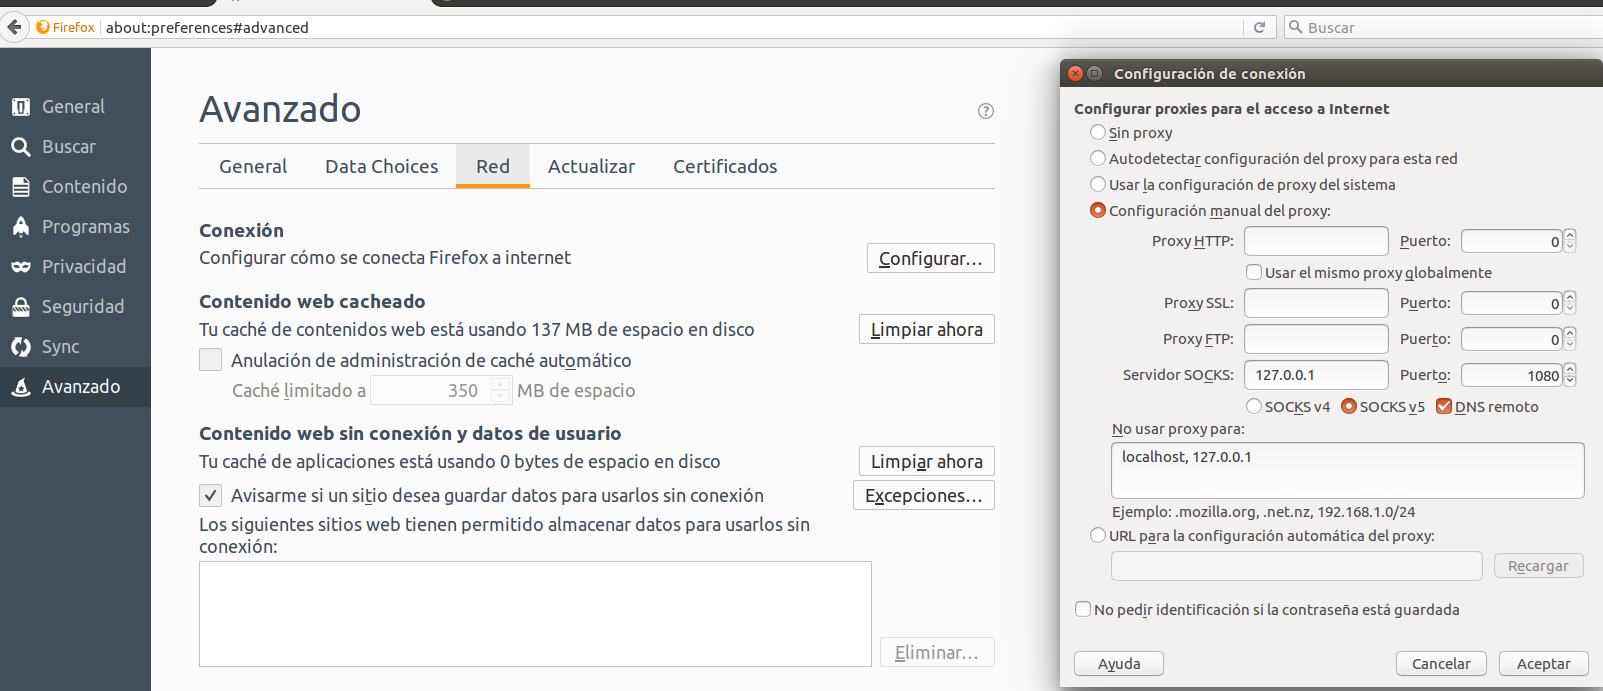
For Firefox, the setting is at Preferences -> Advanced -> Connection.
Important: Remember to tick the option “Remote DNS”. Otherwise the DNS poisoning attack will still be in effect.
-
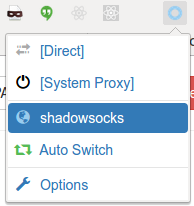
For the stable version of Chrome, there is no built-in setting for proxy. A plugin called SwitchyOmega will help. Since you probably can’t reach Chrome Web Store without circumventing the GFW, you’ll have to search for and install the plugin manually. You may directly download it here. The blogger auooo has also made it available on a web storage. Drag the file into the Chrome “extensions” page (enter chrome://extensions/ in your Chrome address bar to access the page) to install it. Once installed, the configuration is as follows:
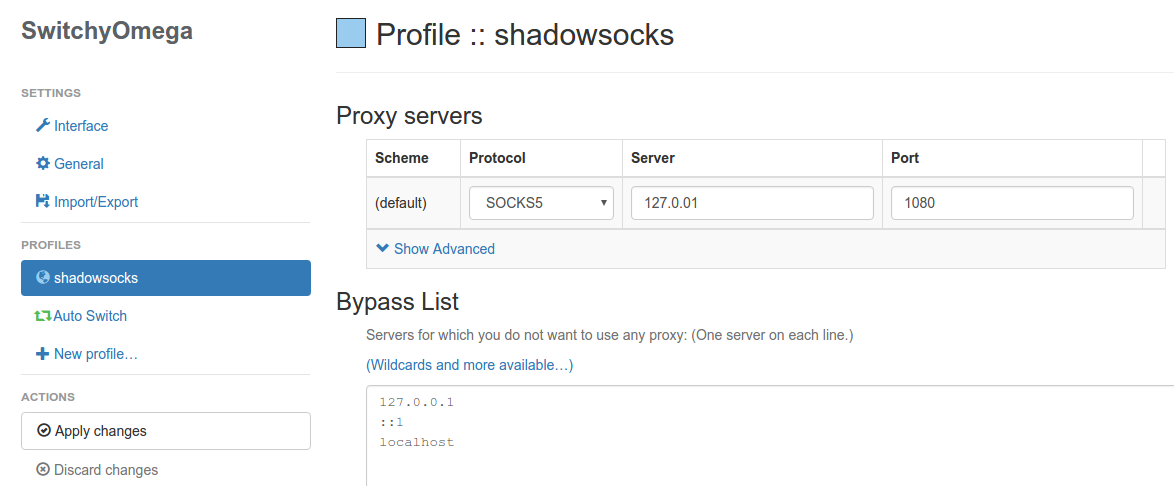
Also remember to select the shadowsocks profile by clicking on the SwitchyOmega icon on the menu bar:
-
For Dropbox, the setting is directly visible among the configuration tabs.
You should be able to apply the similar configuration procedure for other apps that need proxying.
The Android app should be able to proxy all traffic globally by default without the need of manually configuring proxy.
-
For those who can read Chinese, there is a very detailed post by auooo with step-by-step screenshots of client configuration on every operating system. You may want to refer to that post as well.
P.S.: For Mac OS X users, the most common GUI seems to have Chinese as the only available UI language. You may want to follow the step-by-step guide with pictures (in Chinese), or alternatively, build the Qt5 version of the client by yourself.