Before diving into this topic, I would like to first add a disclaimer that I am far from an expert on JVM and Clojure (as I have been working with Elixir most of my professional career). I gave the talk as I was intrigued by the topic and would like to share my learnings. As the saying goes, “the best way to learn a topic you’re interested in is to submit a talk proposal. If the proposal is accepted, you really have to dig into it”. I will try to present the information to the best of my knowledge, but some inaccuracies might be inevitable, in which case feel free to point them out in the comments.
In my talk, I approached the comparison from two dimensions: BEAM/ERTS vs. JVM and the Actor Model vs. CSP. Theoretically speaking, the Actor Model and CSP might be considered the two sides of the same coin. However, practically speaking, there have been some major differences in their popular implementations, with implementations of the Actor Model such as BEAM and Akka focusing a lot on the no-shared-memory aspect, while implementations of CSP such as seen in Golang, Rust and Clojure’s core.async focus a lot on the “execution flow” aspect, with the implicit underlying assumption that the concurrency still takes place in a shared-memory environment. Therefore, I considered it helpful to also touch upon the differences between the BEAM and the JVM, which serves as a nice foundation for understanding the differences between the implementations.
BEAM vs. JVM
BEAM
Here I would like to emphasize these two aspects of the BEAM VM: per-process memory space and preemptive scheduling.
Per-process memory
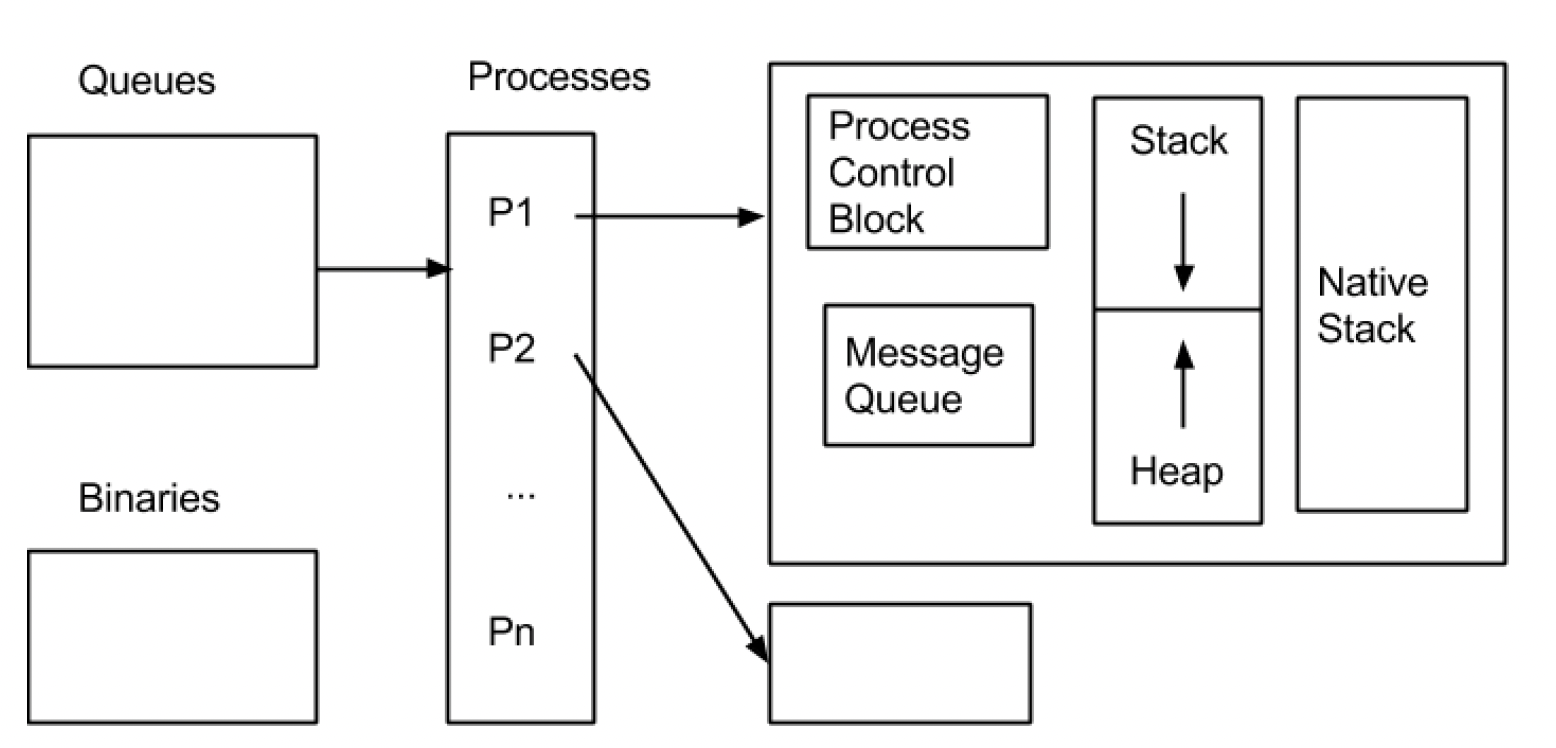
The following is a simplified illustration of the BEAM/ERTS memory layout (Pool 2015). The key takeaway here is that each process has its separate heap, i.e. they share no memory with each other, which is key to its Actor Model, which we’ll discuss later.
A corollary of this is that there will be no global garbage collection that could potentially impact all processes at the same time.
(There are some optimizations, such as large binaries being stored separately, so that only pointers to them instead of full copies of them need to be passed around, which we will not explore in detail here.)
Preemptive scheduling
The mechanism with which schedulers work is a unique and sometimes overlooked feature of BEAM. This is what enables the soft real-time nature of BEAM and what makes it great at handling massive concurrency challenges (but maybe not the best at handling CPU-intensive tasks).
When you launch an iex session, the smp:20:20 part actually indicates the number of schedulers available (“smp” stands for “Symmetrical Multiple Processes”). It’s usually the same as the number of CPU cores.
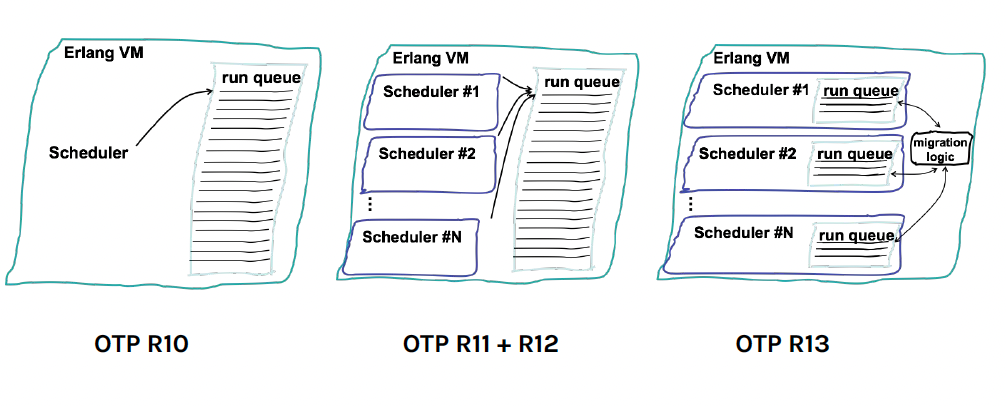
Since OTP 13, each scheduler has its own process queue. All processes of the BEAM are load-balanced across all schedulers.
With preemptive scheduling, once a process runs for 4000 reductions (one reduction is approximately 1 function call), it will be put to the back of the queue, and replaced by the next process in the queue. This ensures highly consistent time-sharing across all processes. (Independent GC also helps.) Imagine if you have 100K connections being handled on the same VM via 100K processes, nobody will necessarily hog any more CPU time share than any other process, and everybody gets the same experience, which is great.
However, you can easily see how this might not be ideal if you need to handle a special number-crunching workload which requires intensive CPU usage over a sustained period of time (dynamic typing is another negative against this use case). Indeed, you would then usually resort to NIFs, i.e. Native Implemented Functions (which are run on dirty schedulers), or ports (a mechanism with which BEAM can communicate with external programs). Note that NIFs are not subject to preemptive scheduling however (thus “dirty”), and thus can actually block if you’re not careful on how it terminates.
JVM
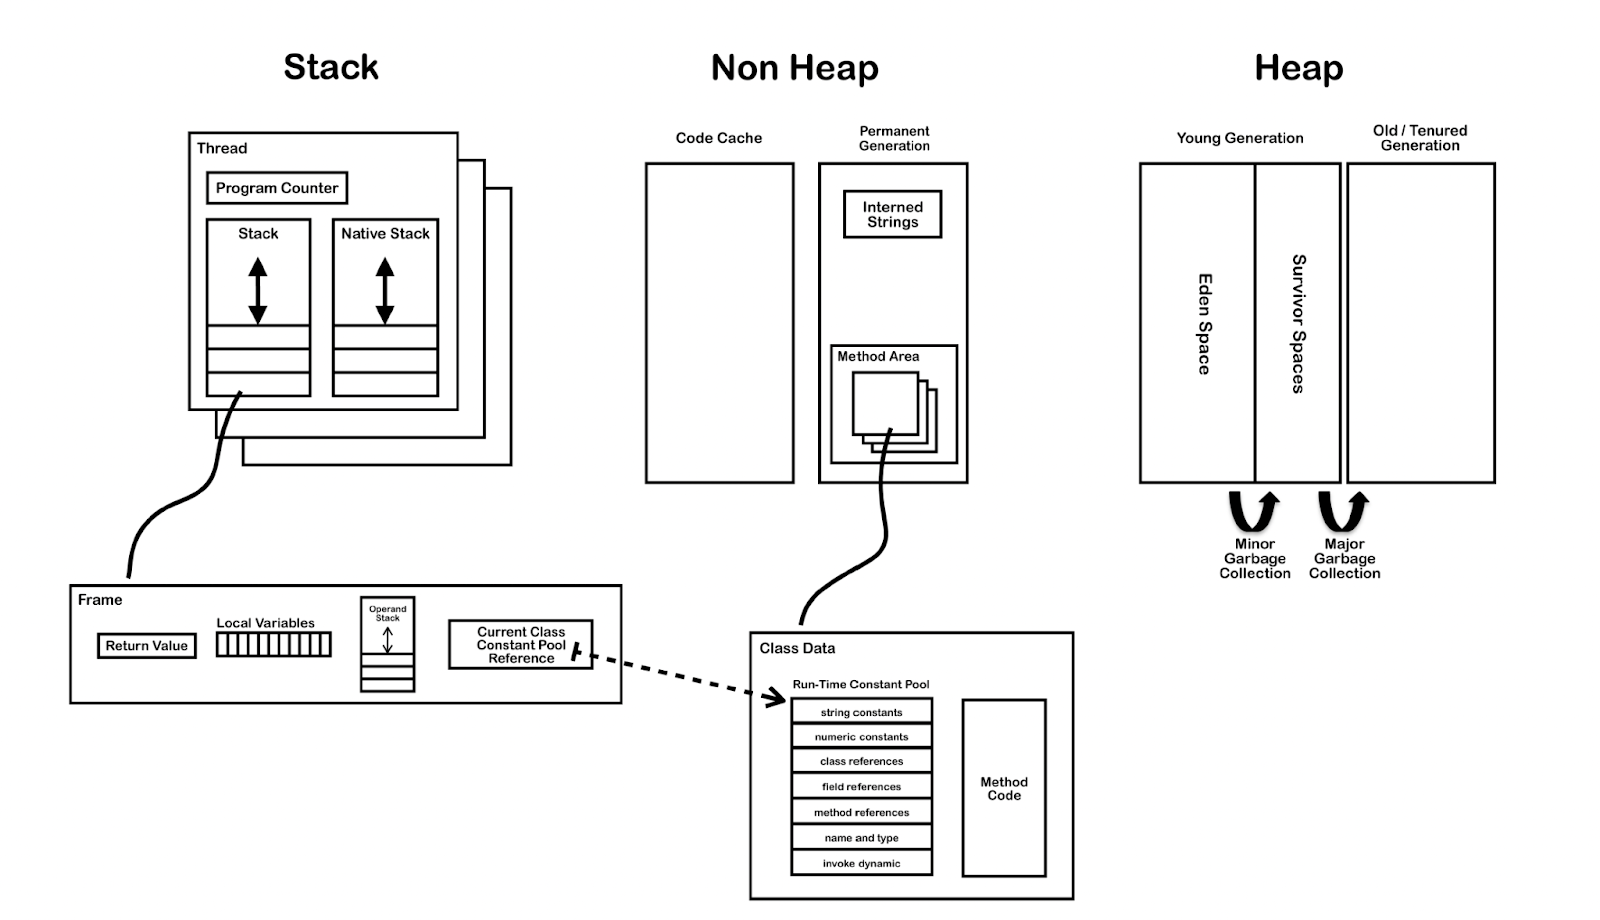
In contrast to BEAM’s per-process memory model and preemptive scheduling, JVM takes a relatively conventional approach which many might be more familiar with.
Shared Heap
JVM has a heap which is shared by all threads, which facilitates shared-state concurrency, in which multiple threads can potentially read and write the same memory space and thus the same resource. This requires the use of concurrency mechanisms such as locks in Java or atom, agent, ref, var in Clojure to avoid race conditions, which however could result in deadlocks if not careful. At the same time, it does make some scenarios which require coordination between multiple threads to perform heavylifting during a CPU-intensive task easier.
(Theoretically, a stop-the-world garbage collection operation can also result in all threads being affected and halted at the same time in contrast to the independent processes run on the BEAM VM, though from what I understand, a lot of optimizations have been made on this front, so this is generally not such a big issue in recent versions of JVMs anymore.)
OS threads and OS scheduler
Conventionally, the JVM creates operating system threads and relies on the operating system scheduler to run the threads. Therefore, JVM threads are much heavier than BEAM’s lightweight processes, and the frequent blocking and unblocking of threads in IO-intensive tasks will be costly. On the other hand, they’re a great fit for CPU-intensive tasks.
(Note: With the formal introduction of Project Loom in JVM 23, Java has also made virtual threads available, which are much more lightweight and in a sense share similarities with BEAM processes. As it’s still in its early days, its impact on libraries such as Akka and core.async remains to be seen.)
The Actor Model vs. CSP
The Actor Model (Hewitt 1973) and Communicating Sequential Processes (Hoare 1978) were proposed close to each other and co-evolved over the years. (Anecdotally, the creators of Erlang independently arrived at an idea similar to what Hewitt proposed, without first having known about it.)
Theoretically, you can think of the main difference between those two as the distinction between processes as the first-class entities vs. channels as the first-class entities. Beyond that though, the real-world implementations of the Actor Model (e.g. BEAM, Akka) and CSP (e.g. Go, Rust, Clojure’s core.async) tend to also have different practical foci, which we’ll explore in more detail up next.
The Actor Model on the BEAM
As we have seen in the previous section on the BEAM, one key feature of the Actor Model is how the processes should share no memory with one another.
This goes hand-in-hand with the fact that processes are first-class: each process has a unique name; processes communicate by identifying each other by name, then sending messages directly to each other. This concurrency model directly eliminates a lot of race conditions which can lead to subtle bugs in a shared-memory language. Theoretically, all you need to trace are the messages sent and the behaviors of each process upon receiving certain messages. (Of course, as anybody who has worked with Erlang/Elixir can attest, the reality of debugging can still be much messier than what’s promised here, which is unavoidable.)
A related property for actors is that send is non-blocking by default, while receive is blocking. What this means is that a sender process can in a sense “fire and forget” every message it sends, while it’s up to the receiver process to handle messages that arrive at its mailbox via entering a receive call, which would block the process from further operations until a message matching one of the clauses specified in the receive block arrives. Here’s an example in iex:
iex(1)> iex_process = self()
#PID<0.113.0>
iex(2)> spawn(fn -> send(iex_process, {:hello, self()}) end)
#PID<0.114.0>
iex(3)> receive do
...(3)> {:hello, pid} -> "Got hello from #{inspect pid}"
...(3)> end
"Got hello from #PID<0.114.0>"
iex(4)> 1 + 1 # Now iex_process is unblocked and able to do something else
2
Note that if none of the receive block’s clauses match the incoming message, the process will keep waiting and thus be blocked:
iex(1)> iex_process = self()
#PID<0.113.0>
iex(2)> spawn(fn -> send(iex_process, {:hello, self()}) end)
#PID<0.114.0>
iex(3)> receive do
...(3)> :unmatched -> "Will not match here"
...(3)> end
At this point iex is blocked and you can’t do anything further except for e.g. interrupting it.
In addition, a process can never “refuse” to receive messages, and a mailbox’s size is theoretically unlimited if the messages arrive but remain unhandled. In fact, one way to crash a BEAM VM is to overflow the mailboxes! Here’s an illustration of this behavior:
iex(1)> iex_process = self()
#PID<0.113.0>
iex(2)> :erlang.process_info(iex_process, :messages) # Empty mailbox at this point
{:messages, []}
iex(3)> spawn(fn -> send(iex_process, {:hello, self()}) end)
#PID<0.114.0>
iex(4)> :erlang.process_info(iex_process, :messages) # The message is already in the mailbox
{:messages, [hello: #PID<0.114.0>]}
Note how the message is already in the mailbox even though the iex process didn’t specify any receive block to handle incoming messages at all, and may simply be going on with its business obliviously.
(Of course, we rarely need to spawn raw processes and write receive blocks directly in production Erlang/Elixir code. This is because OTP already offers a whole package of abstractions to make the life of developers much easier. A well-known abstraction is gen_server which for example lets you specify with a clear syntax callback functions (handle_call, handle_cast, handle_info) which spell out how the process should respond to incoming messages, and handles a lot of edge cases under the hood so that you don’t need to bother handrolling a receive block. OTP also offers many other tools such as process linking & supervision, node clustering, tracers and debuggers, which are out of discussion scope here.)
CSP with core.async in Clojure
Aside: Conventional approaches to concurrency in Clojure
Before beginning this section, I would first like to point out that core.async is a later addition to Clojure, while Clojure’s more conventional approach to concurrency involves tools such as ref, atom, agent, and var, which, similar to locks in Java, facilitate shared-memory concurrency, but can be much more ergonomic and pleasant to use due to Clojure’s functional nature, which enables the separation of identity and state via the widespread use of persistent data structures (“persistent” in this context refers to the fact that the data structure always preserves its previous version when modified. A classic example of this is a list, to which if you prepend a new head, the tail remains unchanged and a reference to which can be easily kept around as the previous version of the entire list. This is of course a feature shared by other functional languages such as Elixir). Another interesting concept is Software Transactional Memory (STM), which allows you to keep a series of reads and writes in one single transaction, somewhat similar to a database transaction. These ideas are not unique to Clojure: Various functional languages such as Haskell offer similar tools for shared-memory concurrency.
When recording the podcast, Owen raised a very good point that when he first started with Elixir, he thought the no-shared-memory nature of the Actor Model and the BEAM is something that automatically comes with functional programming, which turned out to not be the case. In fact most functional programming languages still handle shared-memory concurrency, just with a different (and some may argue more elegant) flavor compared to how procedural languages traditionally do it. We won’t have time to go into the details of these, though I’d encourage you to refer to the resources listed in at the end of the post if you’re interested in knowing more.
core.async and CSP
Different from the Actor Model, in CSP, processes are anonymous, while channels are named first-class entities. In Clojure’s core.async, you can return a channel from a function and pass it around. Readers and writers use channels to relay messages.
In core.async, the default channel is blocking and synchronous: Once a writer writes a message into the channel, it will be blocked until a reader reads the message.
In this example, we create a channel named c and then spawn two JVM threads. The first thread writes "hello" into the channel, while the second thread reads the message off the channel and prints it immediately, after which the writer gets unblocked.
Similarly, once a reader decides to listen on a channel, it will be blocked until a writer delivers a message:
Here, the reader is blocked first, before it later gets unblocked once the writer puts a message "hello" into the channel.
(There are variants such as buffered channels, which enable non-blocking behavior to some extent: As long as the buffer is not full, a writer will be able to fire and forget and will not be blocked, similar to how a BEAM process sends its message. However, unlike the unlimited mailboxes in BEAM/OTP, there are no channels of unlimited size in core.async, meaning even a buffered channel will get full at some point. Sliding channels and dropping channels can also be used, which drops the oldest or the newest message when full.)
Unlike BEAM mailboxes, channels can be explicitly closed to further writes, after which remaining messages can still be read from the channel.
In terms of topology, each channel can potentially have zero to many readers and writers, and each thread can decide to write to and read from multiple channels at the same time:
When there are multiple readers for one channel, a message will only be read once by at most one reader.
When there are multiple writers for one channel, all other writers will be blocked after the channel is full.
You can use alts!! in core.async (in Go: select) to let a reader read from multiple channels. It will select the channel that first receives a message. Here’s an example from the official guide:
Read hi from #object[clojure.core.async.impl.channels.ManyToManyChannel 0x5cd1c0c4 clojure.core.async.impl.channels.ManyToManyChannel@5cd1c0c4]
Read there from #object[clojure.core.async.impl.channels.ManyToManyChannel 0xd59d3dd clojure.core.async.impl.channels.ManyToManyChannel@d59d3dd]
“go blocks” in core.async
There are actually two ways to run a CSP process for core.async: An actual JVM thread, which is initialized with thread as seen in the examples above, and an inversion of control “thread” initialized with the go macro.
Recall from the JVM discussion that blocking/unblocking each JVM thread is heavy, unlike the lightweight processes that live on the BEAM. In the case of the go blocks, a fixed-size thread pool is used under the hood. Some macro magic takes place to “park” and “unpark” the blocks and switch them in and out of the threads in the pool, instead of the thread variant where a real JVM thread will be blocked. This makes go blocks much more lightweight. Here’s an example taken from the core.async repo:
which output “1000 msgs in 194 ms”, i.e. we spawned 1000 channels and were able to read and write to each of them in mere 194ms!
Inversion of control with go blocks
Another interesting thing to note, as mentioned earlier, is how the use of CSP in Go, Clojure, Rust etc. still facilitates working with shared memory, unlike the Actor Model used on the BEAM and even in Akka to some extent:
“It should be noted that Clojure’s mechanisms for concurrent use of state remain viable, and channels are oriented towards the flow aspects of a system.” - Rich Hickey
“Messages should be immutable, this is to avoid the shared mutable state trap.” - Akka
This “flow aspects” mentioned by Rich Hickey is emphasized by the fact that not only can go blocks be more efficient than thread blocks on the JVM, they also serve as an inversion of control mechanism. This is particularly evident in its use with ClojureScript, which due to its runtime is singlethreaded by nature. The parking and unparking of go processes onto a single thread greatly simplifies the conventional challenge of callback hell. Consider the following example (adapted from Seven Concurrency Models in Seven Weeks):
(defnshow[elem](set!(..elem-style-display)"block"))(defnhide[elem](set!(..elem-style-display)"none"))(defnstart[])(go(let[page1(dom/getElement"page1")page2(dom/getElement"page2")next-page-button(dom/getElement"next")next-page(get-eventsnext-page-button"click")](showpage1)(<!next-page);; Waiting for the user to click on the next-page-button and trigger the event.(hidepage1)(showpage2))))(set!(.-onloadjs/window)start)
If you are familiar with ES6’s async/await, you may immediately see the parallels between the use of <! here and the await keyword. Back in the days, fewer languages had this “async” inversion of control construct. (async/await was only formally added to JavaScript in 2017.) Nowadays it’s very much widespread as it offers tangible benefits, as I’m sure everybody who has refactored some JS callback hell with async/await can attest to.
Conclusion
For many developers, concurrency concepts might sound like something rather removed from their day-to-day work. However, an understanding of the concurrency properties of various programming languages and common concurrency patterns can be an integral part of your general knowledge. I just talked to a developer who was tasked with building a system completely in NodeJS, but decided and convinced the team that it might be a better idea to build the payment processing component in Elixir, which is still working extremely well under heavy traffic a few years later. On the other hand, I also remember a blog post from Discord a few years ago on how they needed to delegate some CPU-intensive tasks to Rust in their server codebase mainly based on Elixir, which as mentioned earlier might not be a one-size-fit-all language especially when you’re faced with the need to handle heavy, sustained workloads.
Having a thorough understanding of the concurrency model of the language you work with daily also helps you have a much firmer grasp on your programs’ behaviors.
This topic is so big that it’s impossible to cover it with a talk, a podcast episode, or a blog post. If you’re interested in exploring further, I would highly recommend the book Seven Concurrency Models in Seven Weeks, which I greatly enjoyed, and the other resources listed below. Even if you won’t get to try out all the concurrency patterns and programming languages at work, this knowledge is intellectually very satisfying in its own right, and can aid you greatly in your journey to becoming a better programmer.
As I’ve written in previous posts(1, 2), I’m a huge fan of Emacs Org mode. One thing that I’ve been doing on-and-off is to use Org mode to also track my time and implement the pomodoro method. It’s not entirely perfect, though one thing that has helped me a lot is to display the current pomodoro status in the menu bar, which makes it much easier to keep an eye on things even when I’m not using Emacs. No matter how great an OS Emacs is, surely you can’t live your whole life within it? ;)
The following screenshots show this in action under four different pomodoro clock types, respectively:
Normal pomodoro:
Pomodoro in overtime (enabled with org-pomodoro-manual-break set to t):
Short break
Long break
I’ll describe my setup in MacOS. The method should be replicable in Linux and Windows with minimum adaptations. I also came across a post for Linux and an app for Windows achieving something similar using alternative approaches, which you might be interested in checking out.
There are two key pieces to this approach:
the function org-pomodoro-format-seconds, which outputs the pomodoro clock according to org-pomodoro-time-format (not necessarily in seconds, thus it’s somewhat of a misnomer).
the open-source app BitBar which evaluates an arbitrary command and displays the output in the menu bar.
The following is a step-by-step walkthrough:
Specify the format you want the time to be displayed via org-pomodoro-time-format. In my case I have a simple format of mm:ss:
(setq-defaultorg-pomodoro-time-format"%.2m:%.2s")
Define a function that will produce the final output to be displayed on the menu bar for the script. In my case I made the following additions to the string output:
Prepend prefix characters “P”, “O”, “B”, “LB” to indicate the exact state of the pomodoro.
Display “N/A” when there’s no ongoing pomodoro.
The entire function definition is as follows:
(defunjx/produce-pomodoro-string-for-menu-bar()"Produce the string for the current pomodoro counter to display on the menu bar"(let((prefix(cl-caseorg-pomodoro-state(:pomodoro"P")(:overtime"O")(:short-break"B")(:long-break"LB"))))(if(and(org-pomodoro-active-p)(>(lengthprefix)0))(listprefix(org-pomodoro-format-seconds))"N/A")))
Install BitBar and ensure it runs normally. Open BitBar’s plugin folder. Create a shell script org-clock.1s.sh that calls emacsclient to evaluate the above-defined function:
The 1s part indicates that BitBar should evaluate this script every one second.
You may need to run chmod +x org-clock.1s.sh after creating it to make it executable.
If the emacsclient command fails, you may need to ensure that (server-start) is run automatically every time Emacs starts, so that the Emacs server/client is available.
The script is as follows:
#!/bin/bashexport PATH='usr/local/bin:/usr/bin:$PATH'# The default output of (org-pomodoro-format-seconds) contains parentheses, which I don't need. Sub them out with sed.
emacsclient --eval"(jx/produce-pomodoro-string-for-menu-bar)" | sed's/["()]//g'
That’s it! Now, whenever you start a pomodoro in org-mode, you should be able to see the clock reflected in your menu bar :)
When I first switched over from Vim to Spacemacs, one thing that really caught me off guard was the behavior of / search under evil-mode. evil-mode reproduces the Vim experience so well, it’s easy to forget the underlying Emacs base of it all.
Turns out, both Vim and Emacs have their own regex syntaxes that are slightly different from the one used by PCRE (Perl-Compatible Regular Expressions). vi (and its predecessor ed) and emacs are both older than Perl, so this is to be expected.
I would like to list some of the differences that are likely to be encountered in your day-to-day work. I will also list some resources that you can refer to for more details.
Differences between Emacs Lisp regex and PCRE regex
The following are some common gotchas of Elisp regex:
You need to escape some additional symbols such as:
backslash \:\\
alternation |:\|
grouping ( and ):\( and \)
counting { and }:\{ and \}
\s begins a syntax class. Whitespaces are denoted as \s- instead of \s.
Use [0-9] or [:digit:] instead of \d to denote digits.
Use \1, \2 etc. instead of $1, $2 to refer to the results of capturing parentheses.
Perl    Vim     Meaning
---------------------------
x?      x\=     Match 0 or 1 of x
x+      x\+     Match 1 or more of x
(xyz)   \(xyz\) Use brackets to group matches
x{n,m}  x\{n,m} Match n to m of x
x*?     x\{-}   Match 0 or 1 of x, non-greedy
x+?     x\{-1,} Match 1 or more of x, non-greedy
\b      \< \>   Word boundaries
$n      \n      Backreferences for previously grouped matches
You can also get some additional information via :help perl-patterns.
There are some ways to change the behavior of Vim regex:
Use the “very magic regex mode” by prepending the pattern with \v. However, note that \b will still mean “backspace” instead of “word boundaries”.
Manually run perl: :perldo s/searchme/replaceme/g.
Use the plugin eregex.vim which performs the conversion automatically and allows you to search using PCRE regex by default.
Update: horde is a library that is “built to address some perceived shortcomings of Swarm’s design.” (from the introductory blog post), and is currently (as of December 2020) more actively maintained than Swarm. It also works together with libcluster. We used horde for some new use cases and we recommend you to also check it out if Swarm doesn’t fit your need.
We run Elixir on Kubernetes. While there were some rough edges for such a setup a few years ago, it has become much easier thanks to libraries such as libcluster and Swarm. Recently, we had a use case which those two libraries fit perfectly. However, since the libraries are relatively new, you might find the documentation and examples a bit lacking and it took us a while to get everything working together. We wrote this comprehensive walk-through to document our experience.
Note that you’d need to run your Elixir instances as releases, either with distillery or built-in releases (Elixir 1.9+), in order for this to work. This walk-through is based on our setup using Distillery.
libcluster and Swarm
First, a bit of background information:
The ability for different nodes to form a cluster and maintain location transparency has always been a huge selling point for the BEAM VM. libcluster is a library that helps with automatic node discovery and cluster formation, especially when the nodes are run in Kubernetes pods.
The main reason you might want a cluster is so you can organize and orchestrate processes across different nodes. This is where Swarm comes into the picture. Swarm maintains a global process registry and automates tasks such as process migration/restart after the cluster topology changes.
In our case, we have some permanent worker processes which should only have one instance of each running across all nodes at any given time. The problem is that we perform k8s rolling deployments with our CD pipeline, thus pods (and therefore nodes) will get destroyed and recreated throughout the day.
With Swarm, we register all above-mentioned worker processes globally, so whenever a pod gets destroyed, its worker processes will be automatically restarted on another healthy pod, ensuring that they are running exactly as envisioned all the time.
(Note: Initially, Swarm contained both the auto-clustering functionality and the process orchestration functionality. Later, the maintainer decided that it would be better to split them into two separate libraries, which become the libcluster and Swarm we see today.)
Clustering with libcluster
In our first step, we’re going to ensure that automatic cluster formation in Kubernetes takes place successfully.
Before we add libcluster to our project, we need to ensure that every Elixir node has a unique name. By default, in the rel/vm.args file generated by Distillery, we have a line just like:
-name <%= release_name %>@127.0.0.1
This means every node will be started as yourapp@127.0.0.1, which is not what we want.
We could first expose the Kubernetes pod IP as an environment variable in the kube configuration (e.g. kube/deploy.yaml) for the Elixir app:
and then you can change the line in rel/vm.argsso the pod IP address will be substituted at runtime:
-name <%= release_name %>@${MY_POD_IP}
After ensuring unique node names, you can already test clustering manually via your console:
# On your local machine
~ kubectl exec -n your-namespace your-pod -c your-container -- sh

# Launch Elixir console after connecting to your k8s pod.
~ bin/console

iex(app@<POD_1_IP>)> Node.connect(":app@<POD_2_IP>")
iex(app@)> Node.list()

# If things are set up correctly, Node.list() should return [":app@<POD_2_IP>"]
Automatic Clustering
Having tested manual clustering, we can then move on to automatic clustering with libcluster.
You may notice that there are three clustering strategies for Kubernetes in libcluster and wonder which one you should use. In our experience, Cluster.Strategy.Kubernetes.DNS is the easiest to set up. All it requires is that you add a headless service to your cluster and no modifications are needed for the already existing (Elixir) pods.
In your k8s config:
---apiVersion:extensions/v1beta1kind:Deploymentmetadata:name:your-app# ...spec:template:metadata:# The selector for the headless service can# find the app by this labellabels:app:your-approle:service# ...---apiVersion:v1kind:Servicemetadata:name:your-app-headlessspec:clusterIP:None# The selector is just a way to filter the pods on which the app is deployed.# It should match up with the labels specified aboveselector:app:your-approle:service
After adding the headless service, we’re finally ready for libcluster. You may add the ClusterSupervisor to the list of supervisors to be started with your app.
### In mix.exsdefpdepsdo[...{:libcluster,"~> 3.1"},...]end### In config/prod.exsconfig:libcluster,topologies:[your_app:[strategy:Cluster.Strategy.Kubernetes.DNS,config:[service:"your-app-headless",# The one as seen in node name yourapp@application_name:"yourapp",polling_interval:10_000]]]### In lib/application.exdefstart(_type,_args)do# List all child processes to be supervisedchildren=[[{Cluster.Supervisor,[Application.get_env(:libcluster,:topologies),[name:Yourapp.ClusterSupervisor]]}],# Start the Ecto repositoryYourapp.Repo,# Start the endpoint when the application startsYourappWeb.Endpoint,]opts=[strategy::one_for_one,name:Yourapp.Supervisor]Supervisor.start_link(children,opts)end
If everything goes well, your pods should already be automatically clustered when you start them. You can verify this by running Node.list() in the console, similar to what we did above.
Optional: Local cluster setup with docker-compose
During development, you will not want to deploy your changes every time to an actual k8s cluster in order to validate them or run a local k8s cluster for that matter. A more lightweight approach would be to make libcluster work together with docker-compose and form a local node cluster. We found Cluster.Strategy.Gossip the easiest to set up for this purpose.
The following assumes the app is started with docker-compose directly, without using Distillery releases.
First, we need to make sure that each Erlang node has a unique name, just as we did for the production environment. We will do it in our entrypoint script for docker-compose:
# In Dockerfile:
ENTRYPOINT ["/opt/app/docker-entrypoint-dev.sh"]# In docker-entrypoint-dev.sh:if[-z${NODE_IP+x}];then
export NODE_IP="$(hostname-i | cut-f1-d' ')"fi
elixir --name yourapp@${NODE_IP}--cookie"your_dev_erlang_cookie"-S mix phx.server
Then, we need to scale the number of containers for our service to 2. You can easily do it by adding another service in your docker-compose.yml file:
(Note: Another way to achieve the same is to use the --scale flag of the docker-compose up command.)
Finally, we just need to specify our clustering strategy correctly:
### In config/config.exsconfig:libcluster,topologies:[your_app:[strategy:Cluster.Strategy.Gossip,config:[port:45892,if_addr:"0.0.0.0",multicast_addr:"230.1.1.251",multicast_ttl:1]]]
By default, the port and the multicast address should already have been available. If not, you can check your docker-compose configurations.
By this point, the two local nodes should be able to automatically find and connect to each other whenever you start your app via docker-compose.
Process registration with Swarm
After the foundation has been laid with libcluster, we may now move on to Swarm.
This sentence from the documentation is key to using Swarm to its maximum potential:
Swarm is intended to be used by registering processes before they are created, and letting Swarm start them for you on the proper node in the cluster.
Therefore, we found the example from the documentation, which shows Swarm being used together with a normal Supervisor, to be slightly confusing: a normal Supervisormust start with some initial child worker processes, which will not be managed by Swarm. DynamicSupervisor seems to suit Swarm’s use case the most: we can start a DynamicSupervisorwithout any children and ensure all child processes are registered with Swarm before they are dynamically started later.
We can write our DynamicSupervisor module as such:
defmoduleYourapp.YourSupervisordouseDynamicSupervisor# See https://hexdocs.pm/elixir/Application.html# for more information on OTP Applicationsdefstart_link(state)doDynamicSupervisor.start_link(__MODULE__,state,name:__MODULE__)enddefinit(_)doDynamicSupervisor.init(strategy::one_for_one)enddefregister(worker_name)doDynamicSupervisor.start_child(__MODULE__,worker_name)endend
Note that in the init function we didn’t need to provide any actual children to be started.
The register function is a convenience function that needs to be provided to Swarm.register_name/4 whenever we want to start a worker process with Swarm. It simply calls start_child and would return the pid of the started worker.
This is how you would dynamically start your worker process anywhere in your app:
Finally, we come to the definition for the worker process itself. Below is a minimal working example which would simply restart a killed worker process on another node, without preserving its state:
Optionally, if you need to make use of the state handover functionality, you would need to make your worker more complicated with these additions:
# Change the handling of :begin_handoff# This is triggered whenever a registered process is to be killed.defhandle_call({:swarm,:begin_handoff},_from,current_state)do{:reply,{:resume,produce_outgoing_state(current_state)},current_state}end# Handle :end_handoff# This is triggered whenever a process has been restarted on a new node.defhandle_call({:swarm,:end_handoff,incoming_state},_from,current_state)do{:noreply,end_handoff_new_state(current_state,incoming_state)}end
Now, if you kill a node, you should see all the workers that were originally running on it automatically restarted on another node in the cluster.
Thanks for reading. We hope this walk-through has been of some help to you.
I had been an avid user of Spacemacs for a long time. However, it could sometimes be time-consuming to get the setup just right in Emacs land. I would like to share some of my configurations here for a satisfactory editing experience for Elixir and Vue.
Language Server Protocol
Language Server Protocol (LSP) was created by Microsoft to define a common standard for providing editor-agnostic code intelligence support. It has become widely popular since its creation.
Emacs support for lsp comes with the lsp-mode package. Both of the following setups depend on it. Therefore, one needs to install it first, either directly or via the Spacemacs lsp layer.
#In`dotspacemacs/layers`:lsp
Vue.js
The landscape surrounding Vue support on Emacs has been quite confusing.
There had been an old vue-mode package, which is likely to be the first result on Google. However, the package lacks many features compared to Vetur (a popular VSCode extension) such as autocompletion, and is not being actively developed anymore.
There is also a legacy lsp-vue package, which is supposed to leverage vue-language-server from Vetur. However, this package is not compatible with the the newest version of Emacs’ lsp-mode.
Actually, the new lsp-mode already ships with a lsp-vetur.el, which provides support for Vue via vue-language-server. There is even a non-official Vue layer for Spacemacs that integrates with ESLint and Prettier to provide a complete editing experience similar to Vetur in VSCode. I have been using this layer for a while and it works great. The author has mentioned submitting a MR to Spacemacs to incorporate it into the list of official layers, but hasn’t done so yet. That partly explains why it might take one some digging to find it.
To install the layer:
# Folder for private layerscd ~/.emacs.d/private
git clone git@github.com:thanhvg/vue.git
# Install the necessary tools manually# vue-language-server is the language server developed by vetur
npm install-g eslint prettier vue-language-server
You can then enjoy Vetur-like editing capabilities in Emacs. You can find default shortcuts in the layer README.
Elixir
alchemist.el had been the go-to code intelligence tool for Elixir a couple of years ago. However, its development has stalled, and elixir-ls, which provides more complete code intelligence out of the box, is currently the recommended IDE server for Elixir.
While vscode-elixir-ls downloads and builds elixir-ls automatically, we can also manually clone and build the project, so that it can be used by Emacs (and other editors), similar to what we did with vue-language-server.
git clone git@github.com:elixir-lsp/elixir-ls.git
cd elixir-ls
mix compile
# For example, when the target Elixir version is 1.9.0
mix elixir_ls.release -o release-1.9.0
Since we have several projects with different Elixir versions, I also made sure to compile several versions of elixir-ls using asdf, each corresponding to one of the target projects. One just needs to change the .tool-versions file in elixir-ls folder before compiling and releasing again.
The newest lsp-modeprovides support for elixir-ls already. A recent PR to Spacemacs’ Elixir layer introduced support for lsp backend.
To switch between the different versions of elixir-ls compiled for different Elixir versions, we can make elixir-ls-path a directory local variable, by having a .dir-locals.el file in the project root folder:
You could also refer to the comprehensive FAQ on ElixirForum, should you have any questions regarding the setup.
Tweaks and Customizations
On MacOS, you might get an error about exceeding the maximum limit of file descriptors, since lsp-mode tries to watch the folder for changes. Some workarounds are described in this post. If none of them works, you can also disable the file watching altogether:
(lsp:variableslsp-enable-file-watchersnil)
By default, lsp-mode displays a floating window that displays documentation following your cursor movement, which I found a bit intrusive. You can turn it off by setting lsp-ui-doc-enable to nil
(lsp:variableslsp-ui-doc-enablenil)
Then one can display the documentation with , h h.
I don’t like the default behavior, where the documentation buffer pops up at the bottom of the editor. After some digging, it turns out that the *Help* buffer is controlled by popwin. By adding the following configuration, I was able to view the documentation buffer to the right of the screen: